> ## Documentation Index
> Fetch the complete documentation index at: https://lovable.generaltranslation.app/llms.txt
> Use this file to discover all available pages before exploring further.

# Clerk integration

> Learn how to integrate Clerk with your Lovable application

## Why Clerk?

<img src="https://mintcdn.com/generaltranslation-d8a08cd1/jw-DadLCPO99GETa/images/what-is-clerk.png?fit=max&auto=format&n=jw-DadLCPO99GETa&q=85&s=fbdaff4ce1fd8ffdc791bc1a9306a37f" alt="What Is Clerk Pn" width="2648" height="1272" data-path="images/what-is-clerk.png" />

[Clerk](https://clerk.com) handles authentication and user management so you don’t have to build it from scratch. With just a few prompts and config steps, you get:

* Secure sign-in & sign-up (social, password, MFA)
* Prebuilt UI components: user profiles, org management, impersonation
* Support for B2B apps (teams, roles, invitations)
* Integration with Supabase, Stripe (coming soon), and more
* Waitlist mode to manage early access
* Generous free tier: 10K MAUs

## Step-by-step integration guide

<iframe width="100%" height="315" src="https://www.youtube.com/embed/tyAsNwu_xCI?si=VHCGf2IlFRQzVLeD" title="YouTube video player" frameborder="0" allow="accelerometer; autoplay; clipboard-write; encrypted-media; gyroscope; picture-in-picture; web-share" referrerpolicy="strict-origin-when-cross-origin" allowfullscreen />

Here is a step-by-step guide:

<Steps>
  <Step title="Set Up Your Clerk App" stepNumber="1">
    <Steps>
      <Step title="Step 1">
        Create a Clerk Account → [Clerk.com](https://clerk.com)
      </Step>

      <Step title="Step 2">
        In the Clerk dashboard, create a new app

        <Steps>
          <Step title="Step 1">
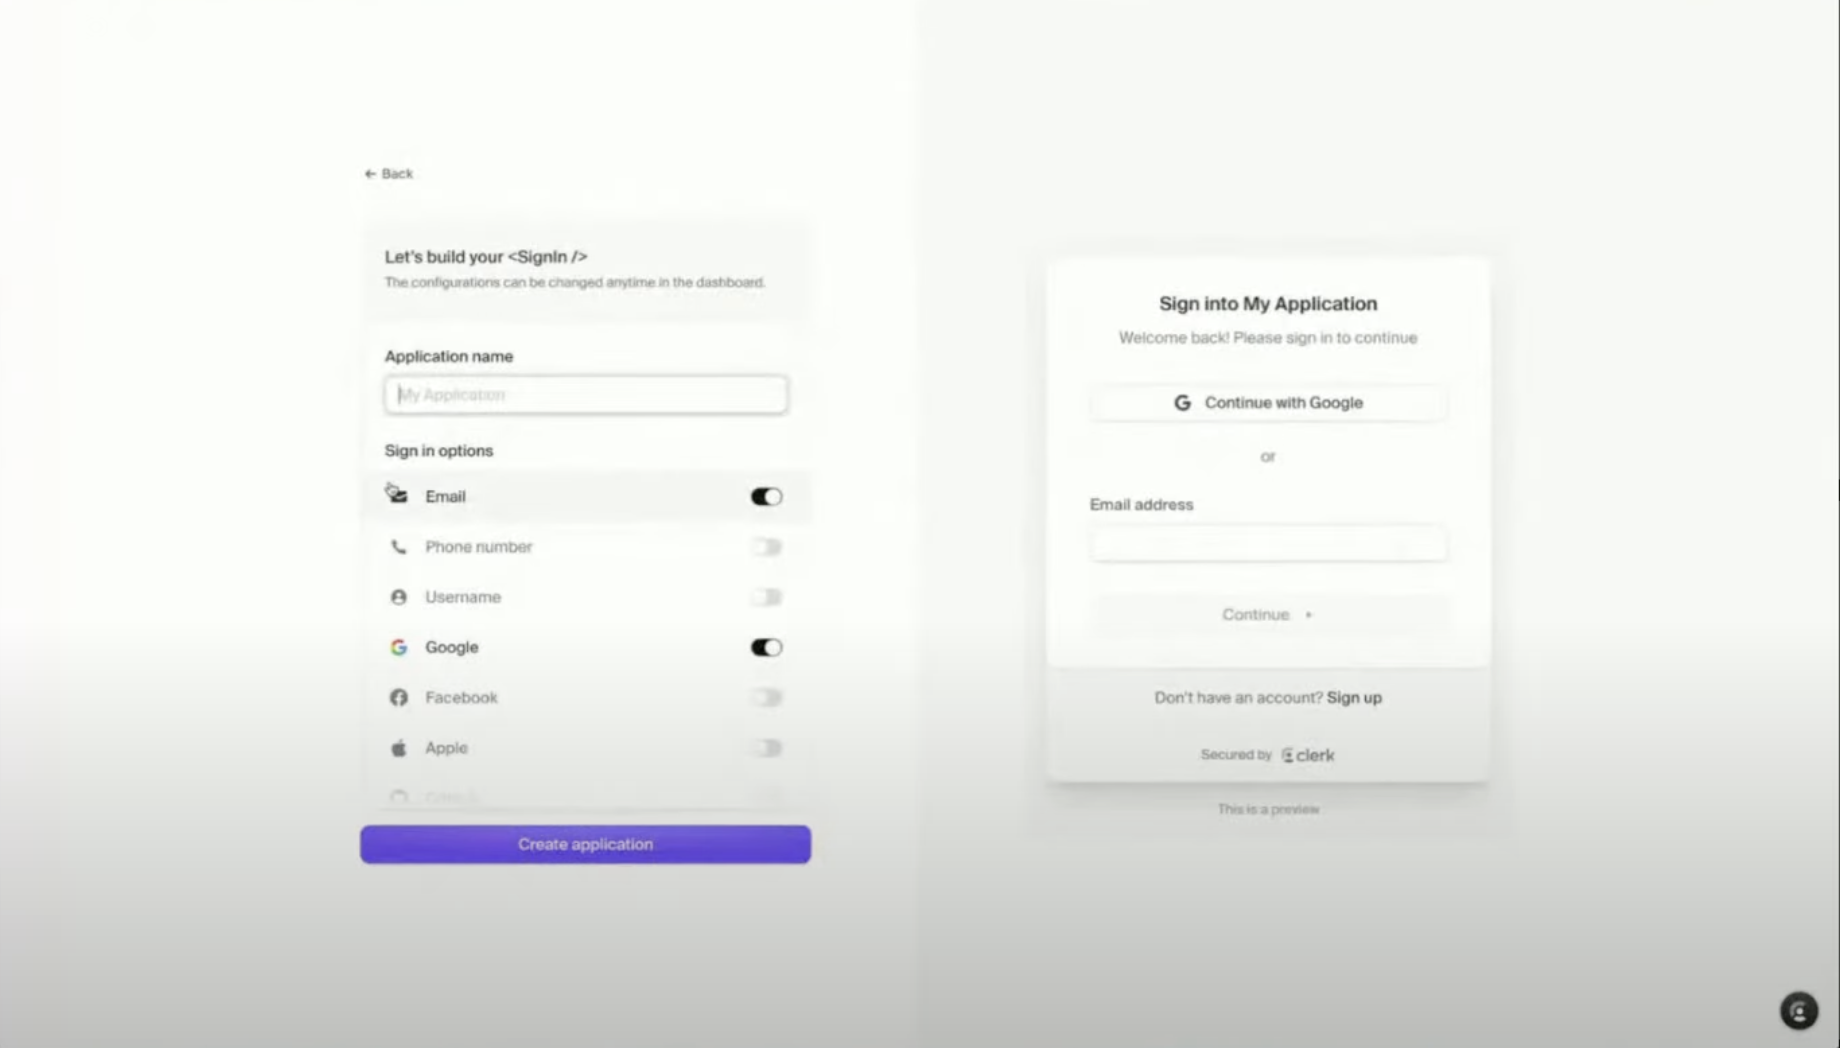
            Sign in to Clerk & create a new app

            <img src="https://mintcdn.com/generaltranslation-d8a08cd1/CqzNmr5z5kHJD2HH/images/create-clerk-application.png?fit=max&auto=format&n=CqzNmr5z5kHJD2HH&q=85&s=3eb11dfb0f3f85b0b6b6b49bb14b9add" alt="Create Clerk Application Pn" width="1840" height="1048" data-path="images/create-clerk-application.png" />
          </Step>

          <Step title="Step 2">
            Enable desired authentication providers (e.g. Google, GitHub)
          </Step>

          <Step title="Step 3">
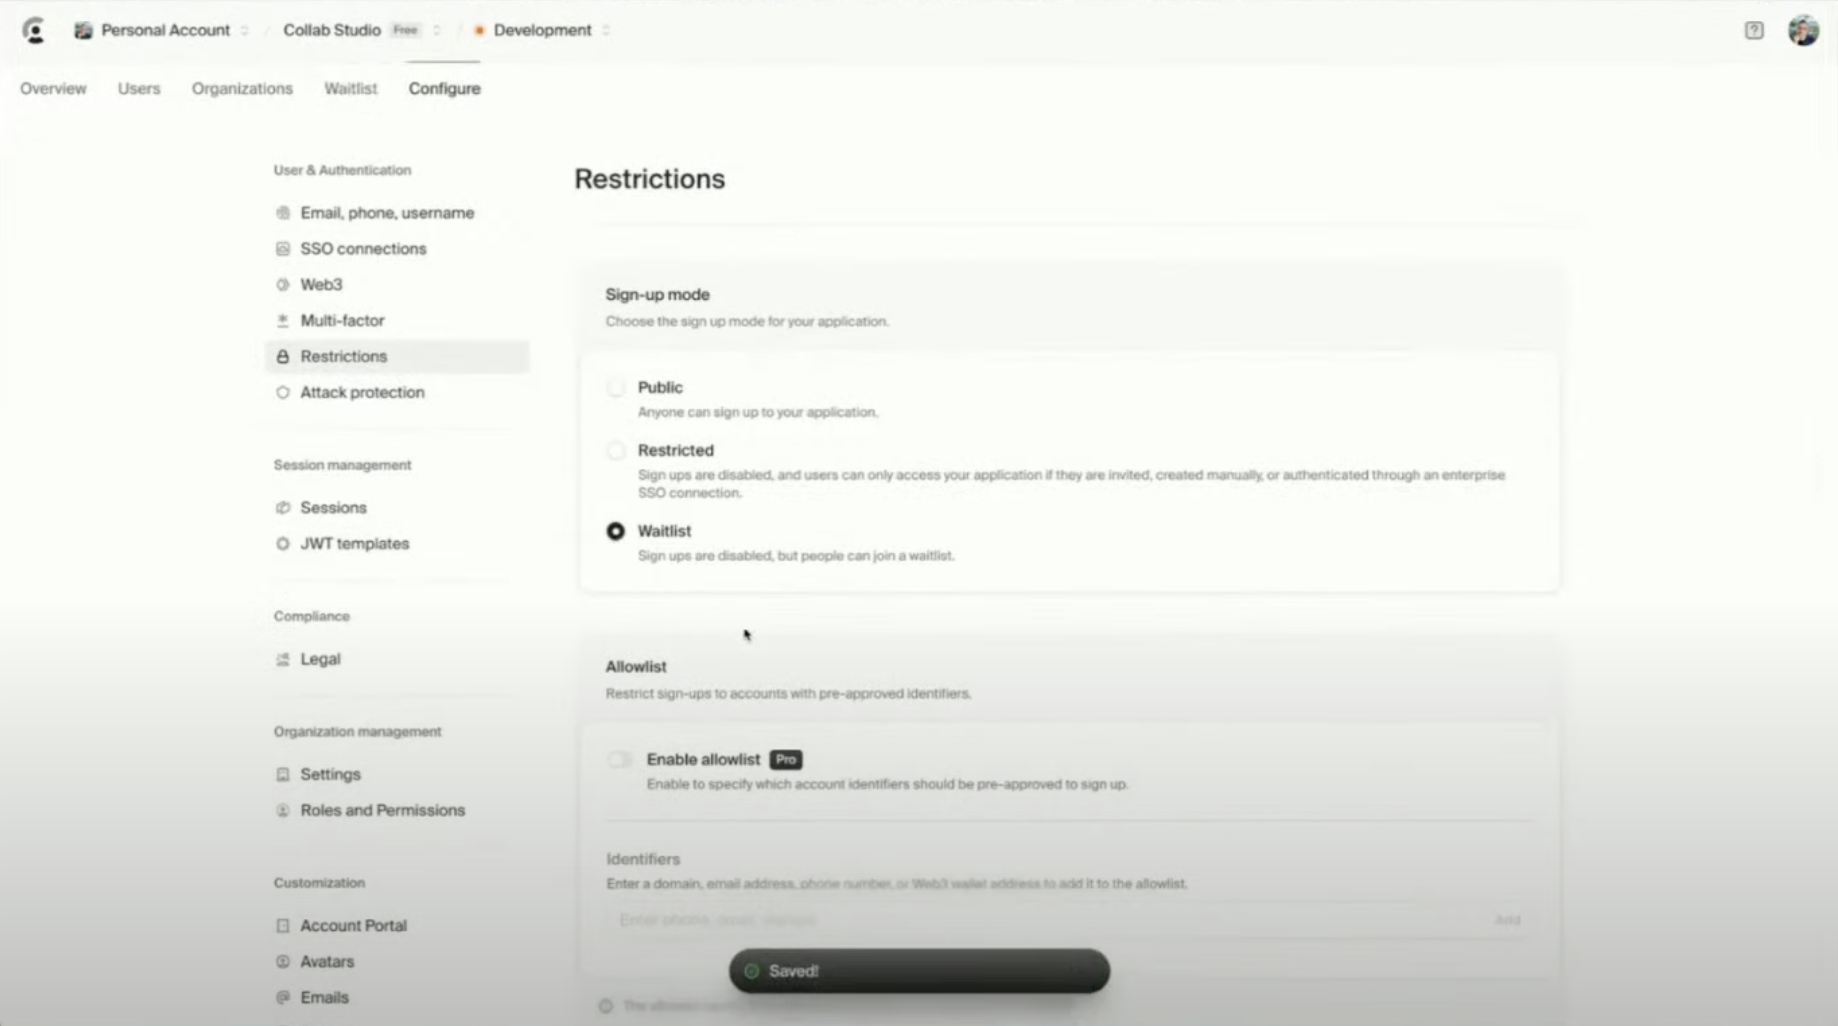
            Enable “Waitlist” under **Configure > Restrictions**

            <img src="https://mintcdn.com/generaltranslation-d8a08cd1/CqzNmr5z5kHJD2HH/images/clerk-waitlist.png?fit=max&auto=format&n=CqzNmr5z5kHJD2HH&q=85&s=0dbc9a96b783c89dea49cc40e6c26baf" alt="Clerk Waitlist Pn" width="1838" height="1026" data-path="images/clerk-waitlist.png" />
          </Step>

          <Step title="Step 4">
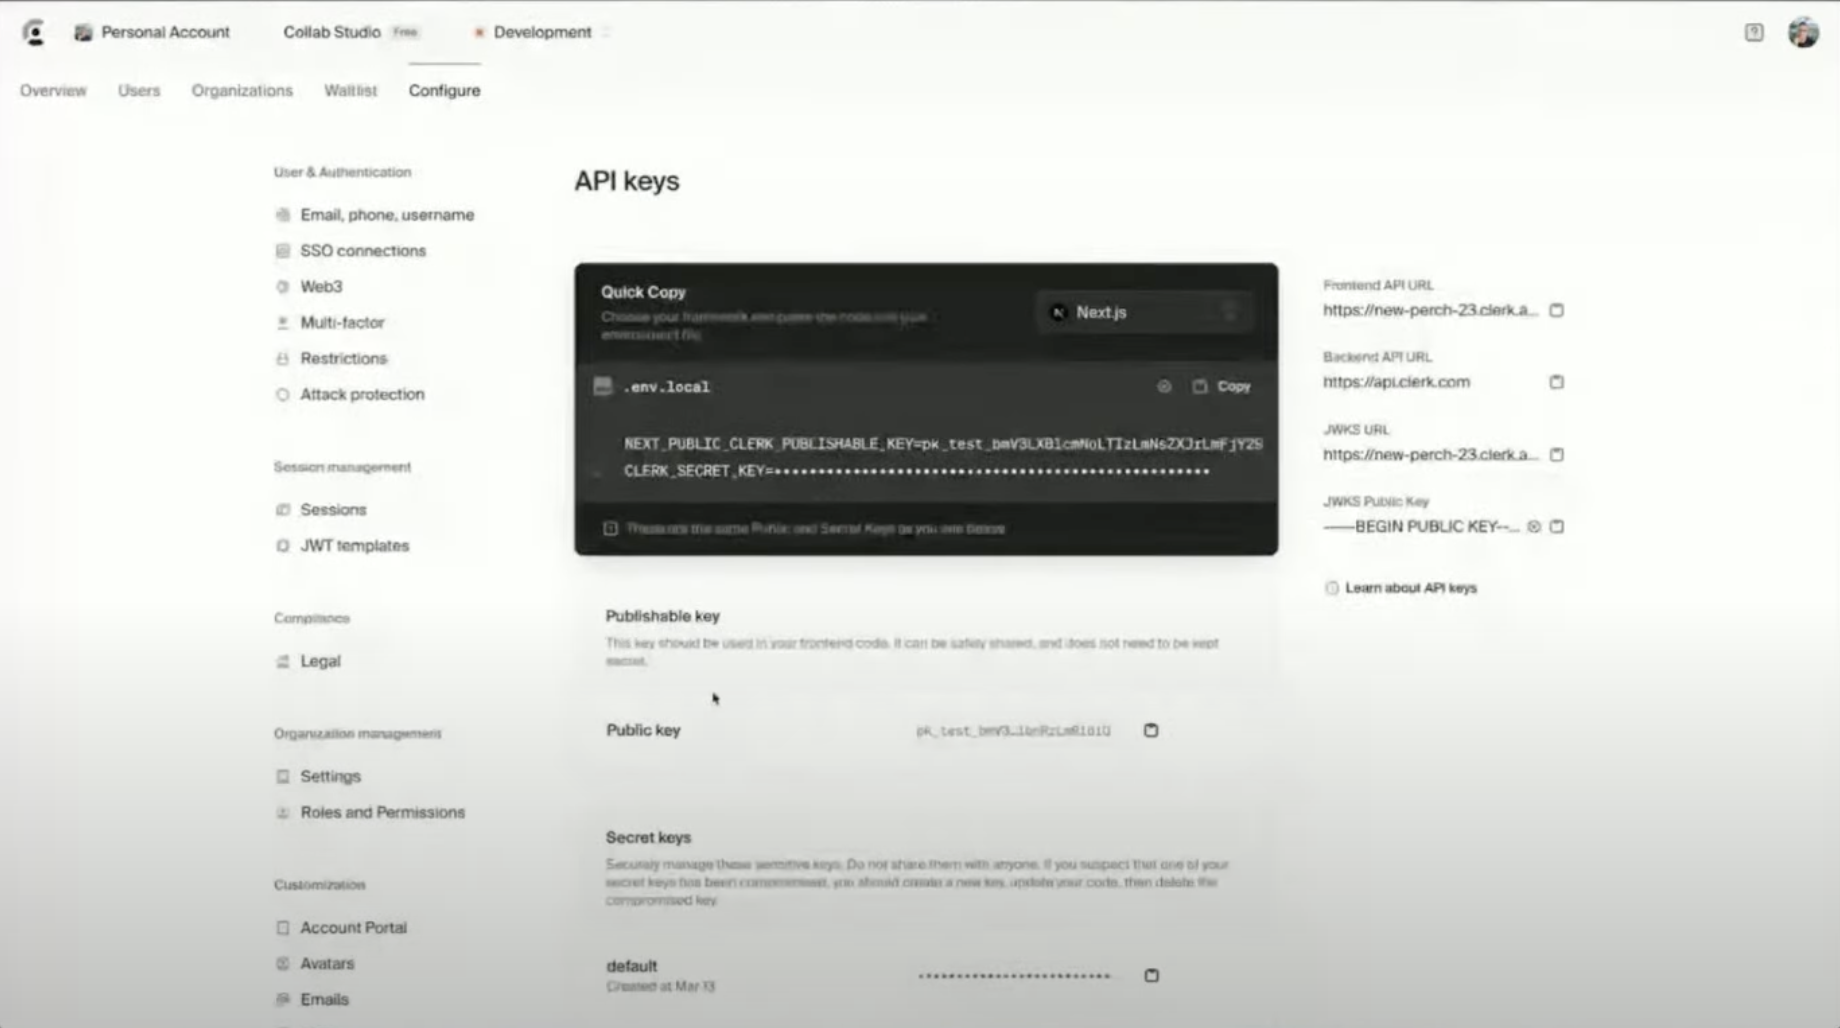
            Copy your **Public API Key**

            <img src="https://mintcdn.com/generaltranslation-d8a08cd1/CqzNmr5z5kHJD2HH/images/clerk-api-key.png?fit=max&auto=format&n=CqzNmr5z5kHJD2HH&q=85&s=4b100e07e88809bfebdc636c799d445a" alt="Clerk Api Key Pn" width="1840" height="1028" data-path="images/clerk-api-key.png" />
          </Step>
        </Steps>
      </Step>

      <Step title="Step 3">
        **Add Clerk to Your Lovable App**

        <Steps>
          <Step title="Step 1">
            In **Lovable**, add Clerk as your authentication provider.

            Prompt Lovable:

            <Info>
              Let's build a beautiful project and task management app in the style of Asana. Users should be able to login and signup using Clerk for authentication and user management. Let's start by building a great looking homepage and use Clerk's waitlist component to let users join while we build the rest of the app.
            </Info>

            <img src="https://mintcdn.com/generaltranslation-d8a08cd1/At48MABj-G93zw7Y/images/asana-clone-lovable.png?fit=max&auto=format&n=At48MABj-G93zw7Y&q=85&s=779eedc11c2ad10d0fa6151f937e31ac" alt="Asana Clone Lovable Pn" width="1830" height="1024" data-path="images/asana-clone-lovable.png" />
          </Step>

          <Step title="Step 2">
            Paste your **Public API Key** when asked
          </Step>

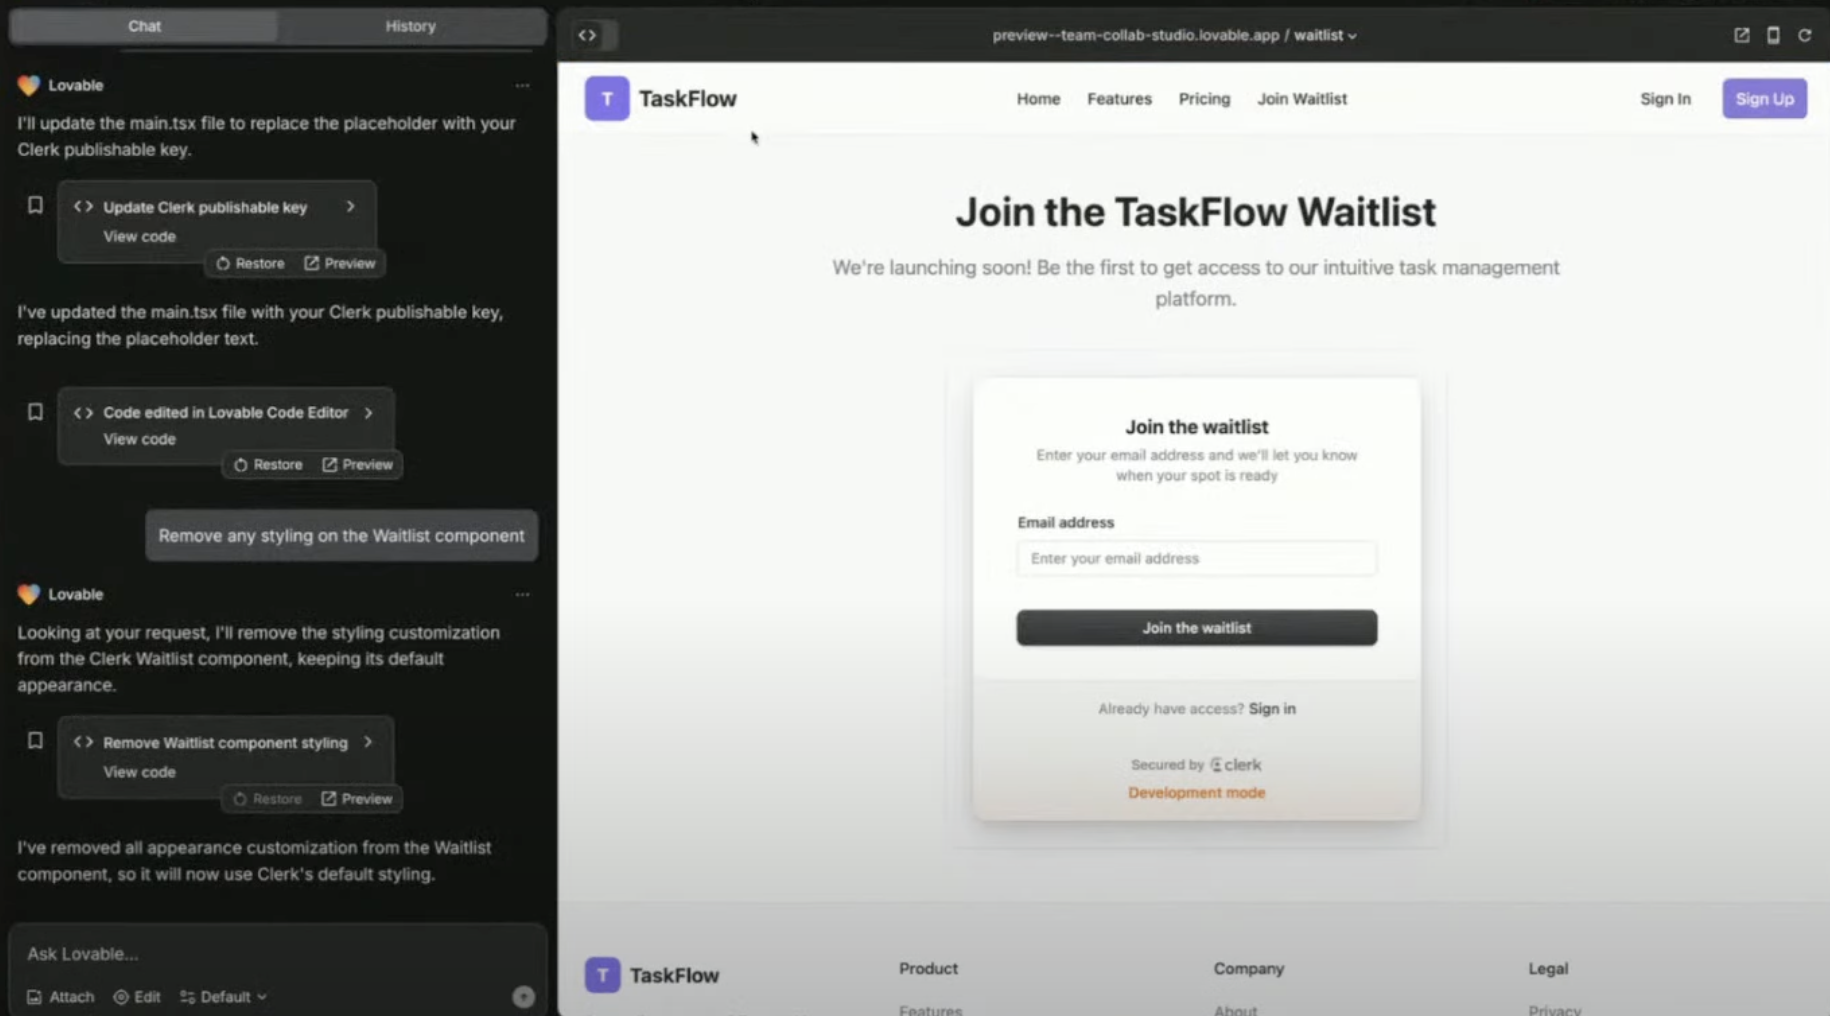
          <Step title="Step 3">
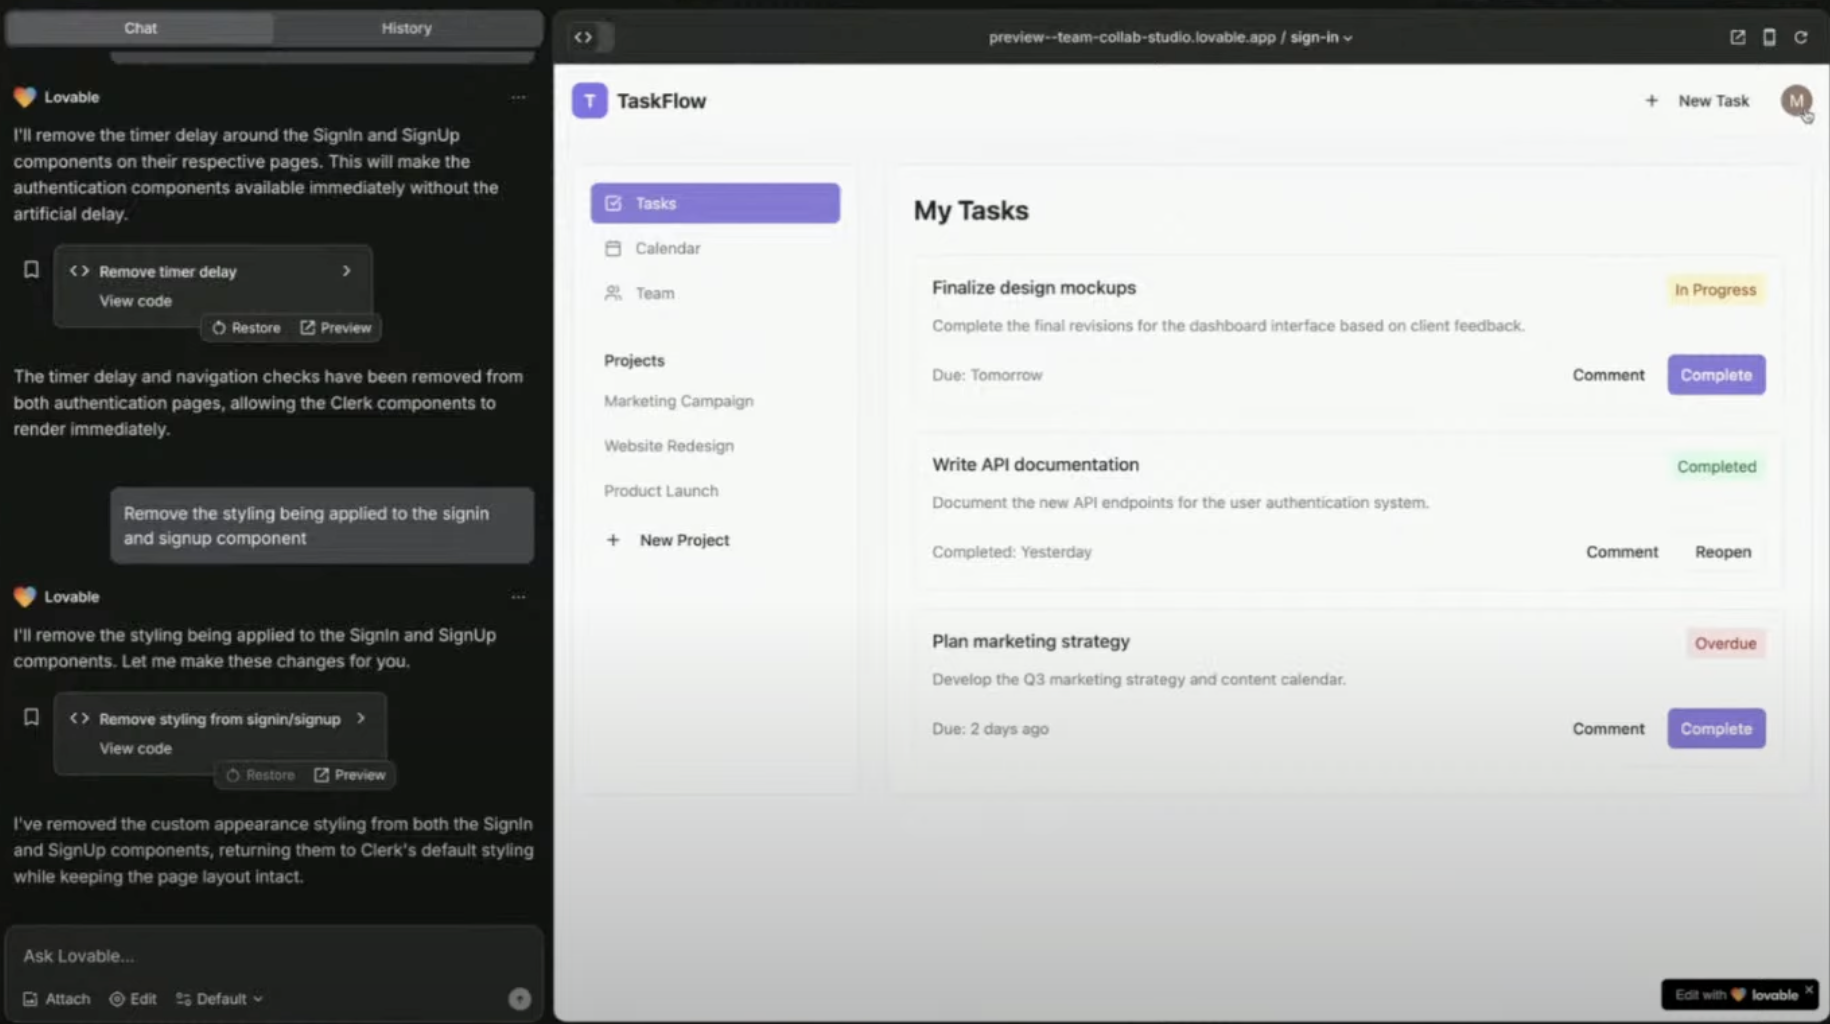
            Lovable scaffolds the login and sign-up pages

            <img src="https://mintcdn.com/generaltranslation-d8a08cd1/jw-DadLCPO99GETa/images/waitlist-component-clerk.png?fit=max&auto=format&n=jw-DadLCPO99GETa&q=85&s=76350e4c4aabb03f8d73ada79c99c6c4" alt="Waitlist Component Clerk Pn" width="1830" height="1016" data-path="images/waitlist-component-clerk.png" />
          </Step>

          <Step title="Step 4">
            Deploy & test — you’re now using Clerk Auth
          </Step>
        </Steps>
      </Step>
    </Steps>
  </Step>

  <Step title="Activate Waitlist Mode (Optional)" stepNumber="2">
    <Note>
      **Why use a waitlist?** – Gather early users before launching your app!
    </Note>

    Use Clerk’s built-in waitlist to collect users pre-launch.

    <Steps>
      <Step title="Step 1">
        In Clerk dashboard: **Configure > Restrictions > Waitlist**
      </Step>

      <Step title="Step 2">
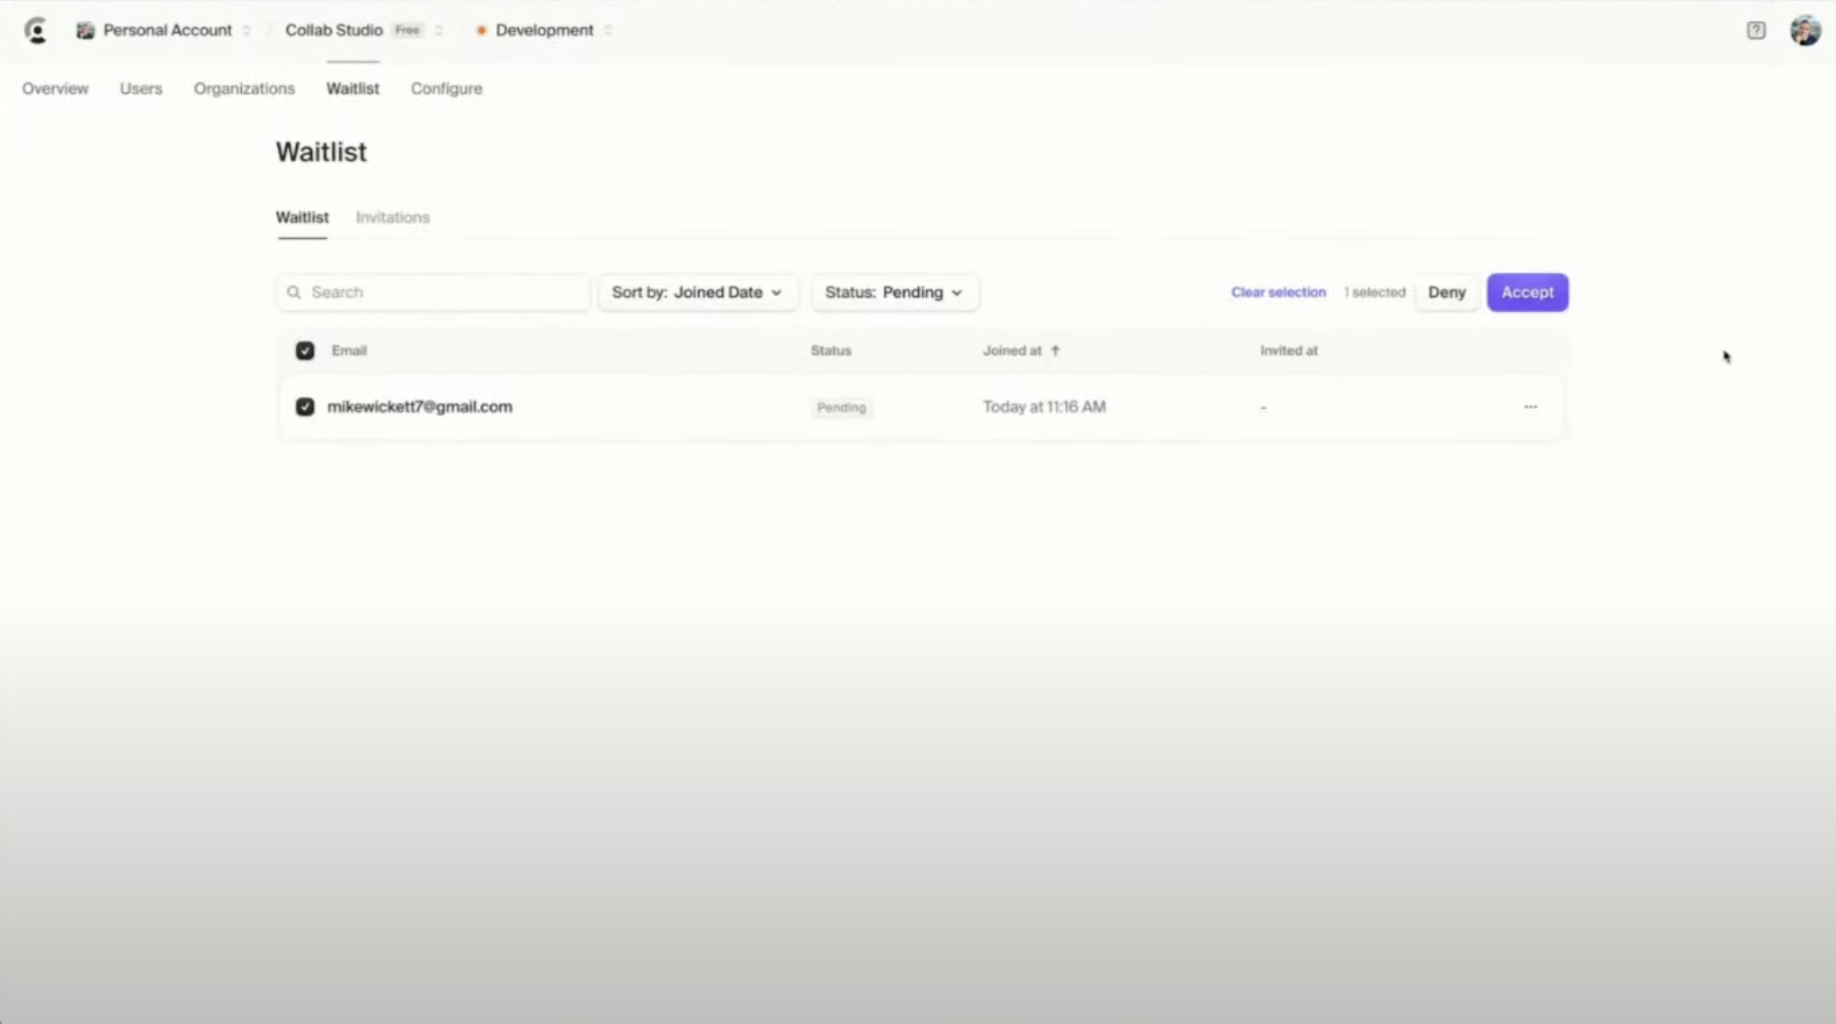
        New sign-ups will show as **pending**
      </Step>

      <Step title="Step 3">
        * Users who sign up will now be **pending approval**
        * Admins can approve users from the Clerk dashboard

                  <img src="https://mintcdn.com/generaltranslation-d8a08cd1/CqzNmr5z5kHJD2HH/images/clerk-waitlist-pending.png?fit=max&auto=format&n=CqzNmr5z5kHJD2HH&q=85&s=b1cb4e017c6696f2170d48e643819c37" alt="Clerk Waitlist Pending Pn" width="1836" height="1024" data-path="images/clerk-waitlist-pending.png" />
      </Step>

      <Step title="Step 4 (Bonus)">
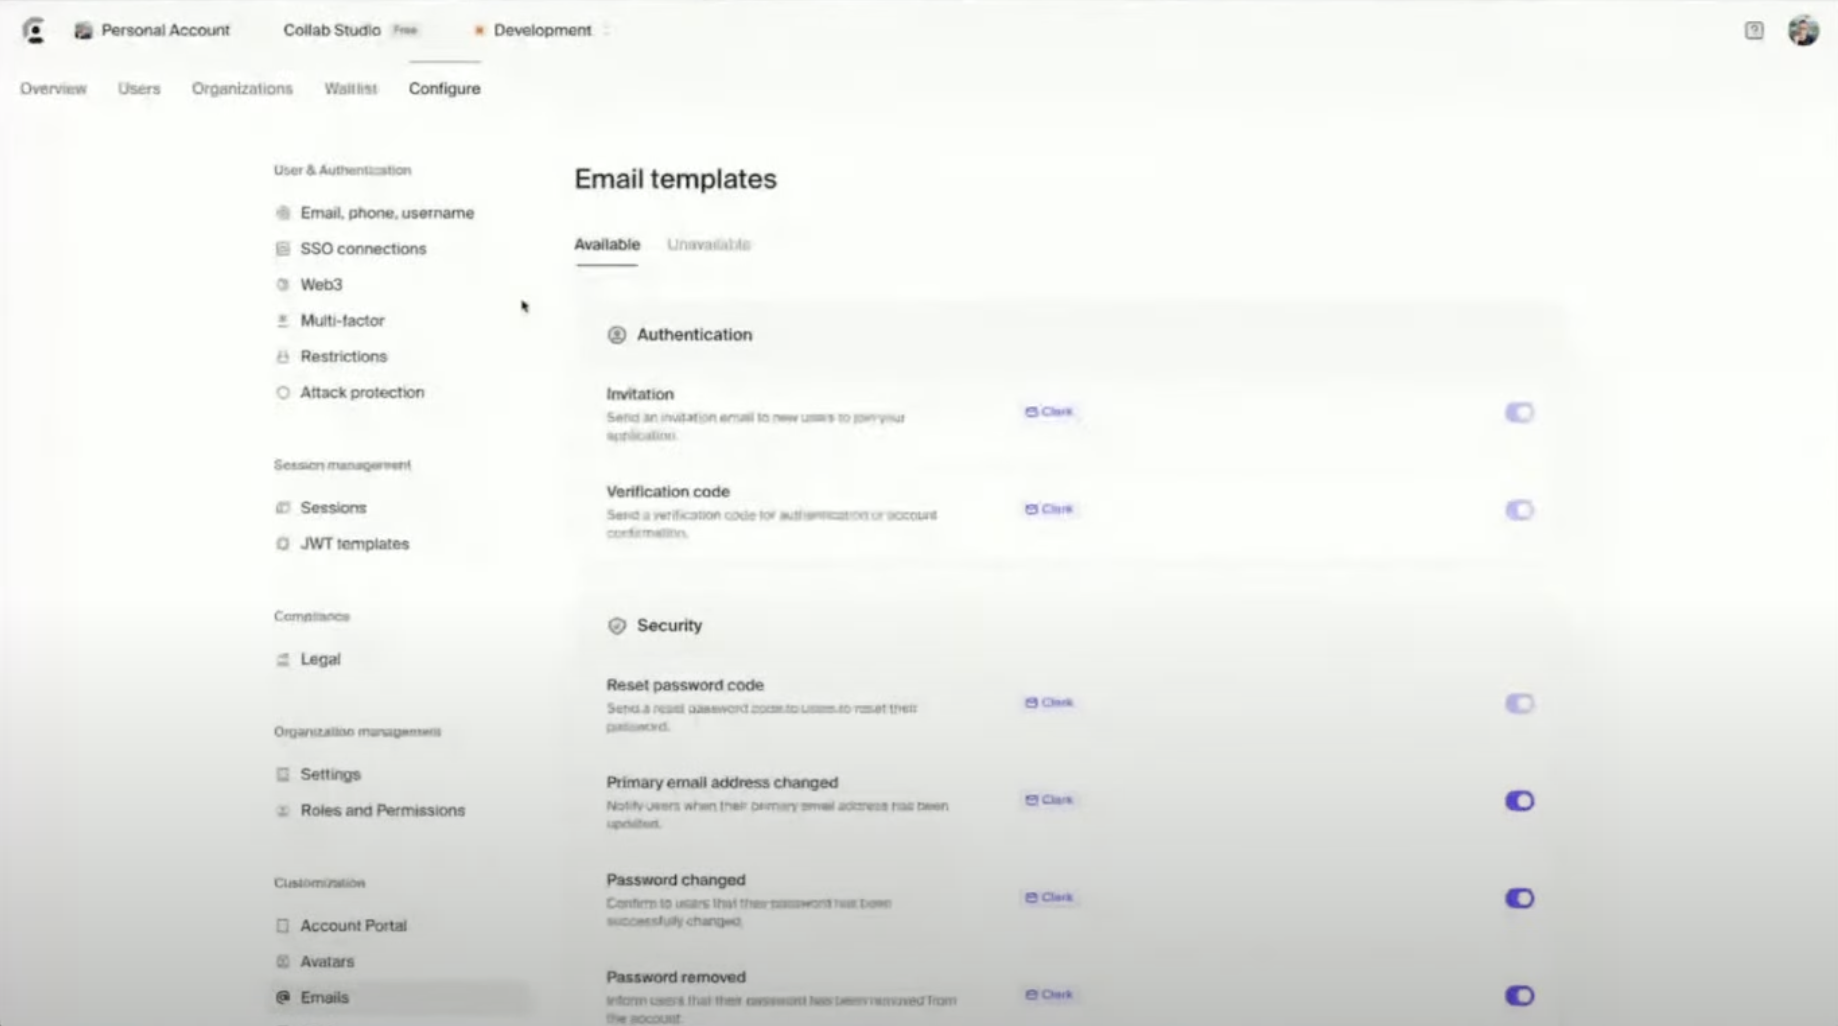
        Customize waitlist emails (branding, content)

        <img src="https://mintcdn.com/generaltranslation-d8a08cd1/CqzNmr5z5kHJD2HH/images/clerk-email-templates.png?fit=max&auto=format&n=CqzNmr5z5kHJD2HH&q=85&s=5283305d887e73b091f90f38de79222c" alt="Clerk Email Templates Pn" width="1838" height="1026" data-path="images/clerk-email-templates.png" />

        <img src="https://mintcdn.com/generaltranslation-d8a08cd1/jw-DadLCPO99GETa/images/sms-code-verification.png?fit=max&auto=format&n=jw-DadLCPO99GETa&q=85&s=c8864119b5019a606848a5ec3314f35f" alt="Sms Code Verification Pn" width="1820" height="1016" data-path="images/sms-code-verification.png" />
      </Step>
    </Steps>
  </Step>

  <Step title="Managing Users & Teams in Clerk" stepNumber="3">
    Set up team-based access in your app.

    <Steps>
      <Step title="Step 1">
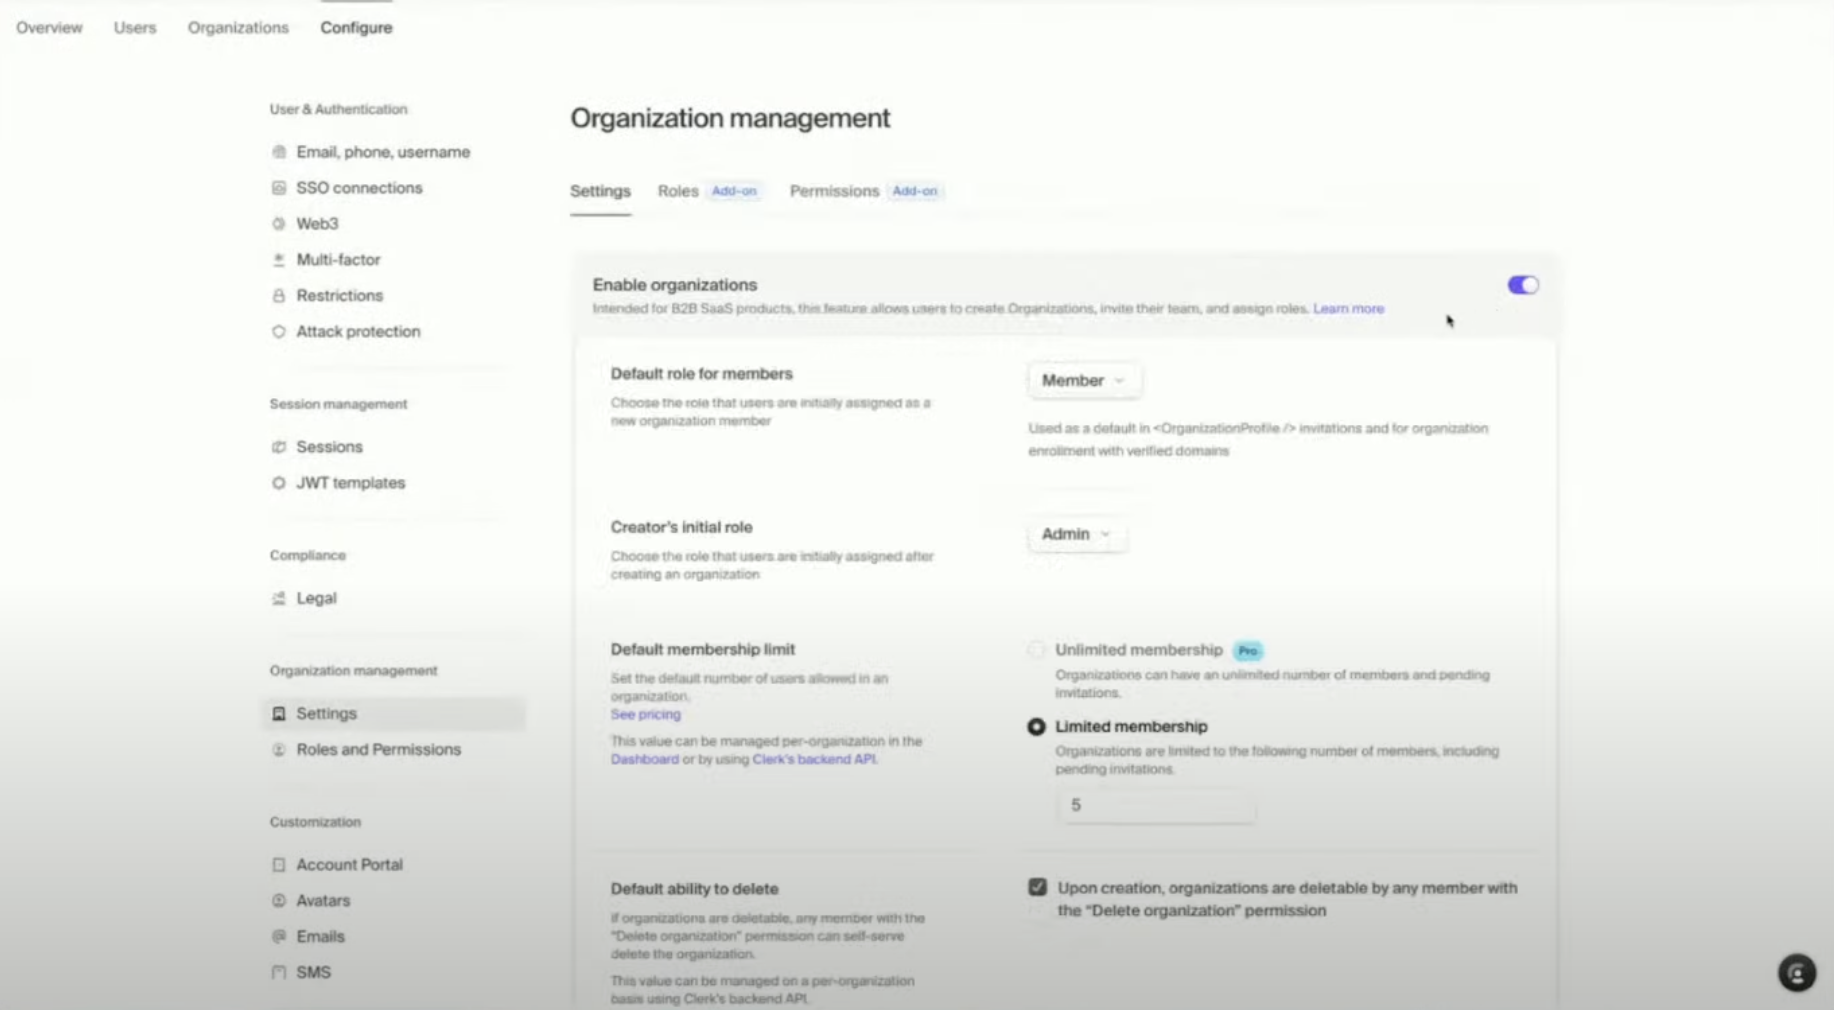
        In Clerk dashboard: enable **Organizations**

        <img src="https://mintcdn.com/generaltranslation-d8a08cd1/CqzNmr5z5kHJD2HH/images/organization-management-clerk.png?fit=max&auto=format&n=CqzNmr5z5kHJD2HH&q=85&s=dee1358df6209650a4e64f09270f9075" alt="Organization Management Clerk Pn" width="1834" height="1010" data-path="images/organization-management-clerk.png" />
      </Step>

      <Step title="Step 2">
        Define roles (Admin, Member, Viewer, etc.)
      </Step>

      <Step title="Step 3">
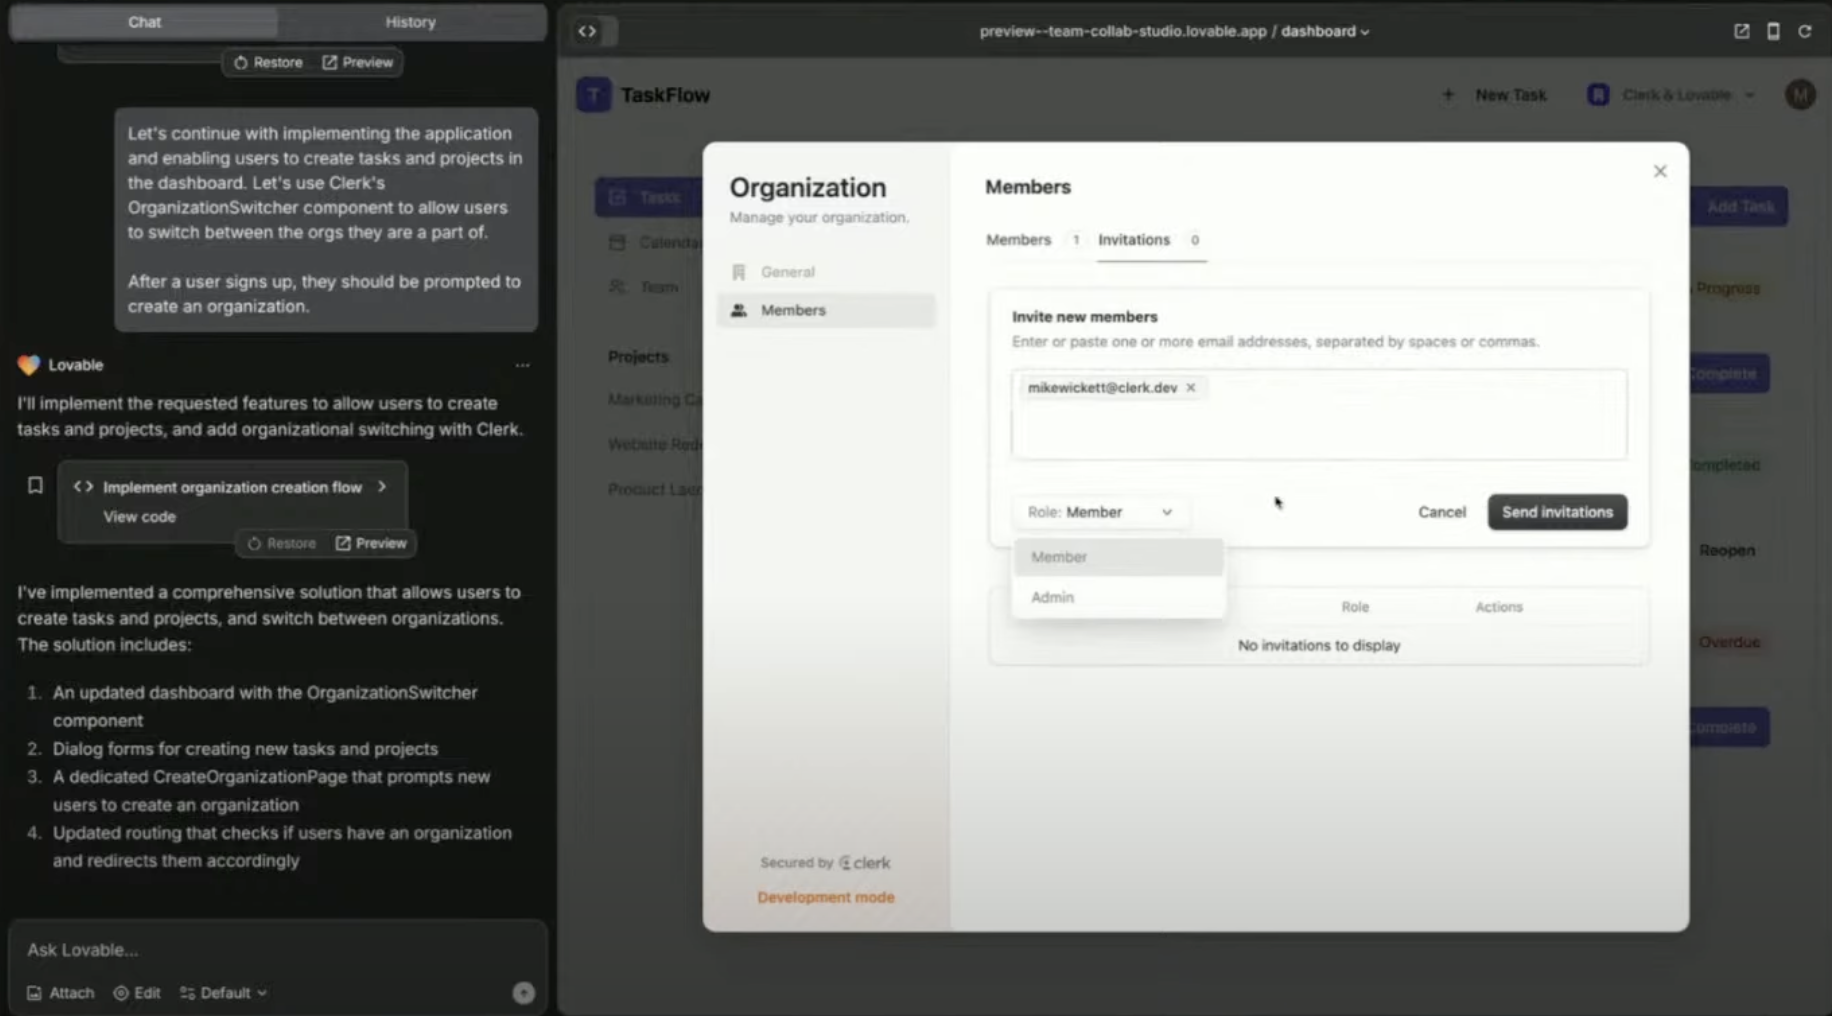
        Invite users to your org by email
      </Step>

      <Step title="Step 4">
        Assign roles and permissions via dashboard
      </Step>

      <Step title="Step 5">
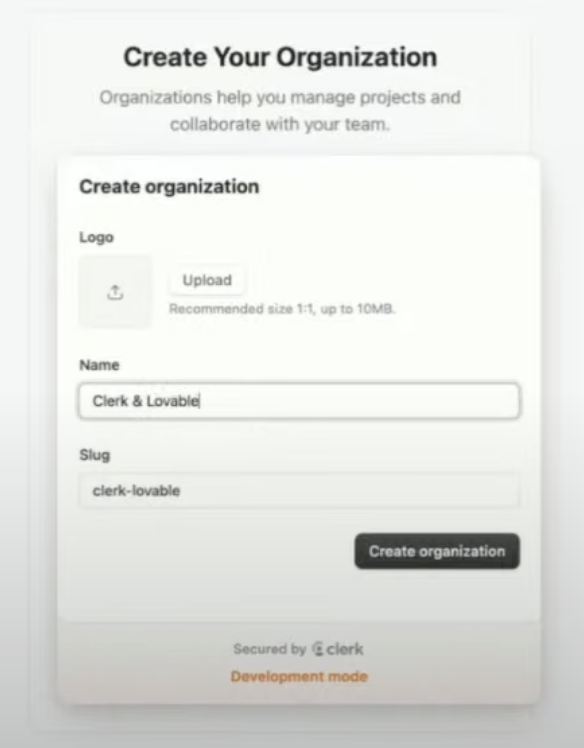
        Prompt Lovable to:

        <Info>
          Ask users to create/join an organization after sign-up
        </Info>

        <img src="https://mintcdn.com/generaltranslation-d8a08cd1/CqzNmr5z5kHJD2HH/images/clerk-organization-create.png?fit=max&auto=format&n=CqzNmr5z5kHJD2HH&q=85&s=d73b6ac4b451427dd6d5745679331f59" alt="Clerk Organization Create Pn" width="584" height="748" data-path="images/clerk-organization-create.png" />
      </Step>
    </Steps>

    <Note>
      **Using Clerk’s User Profile Component**

      * Provides a prebuilt user management dashboard
      * Supports social logins & password authentication
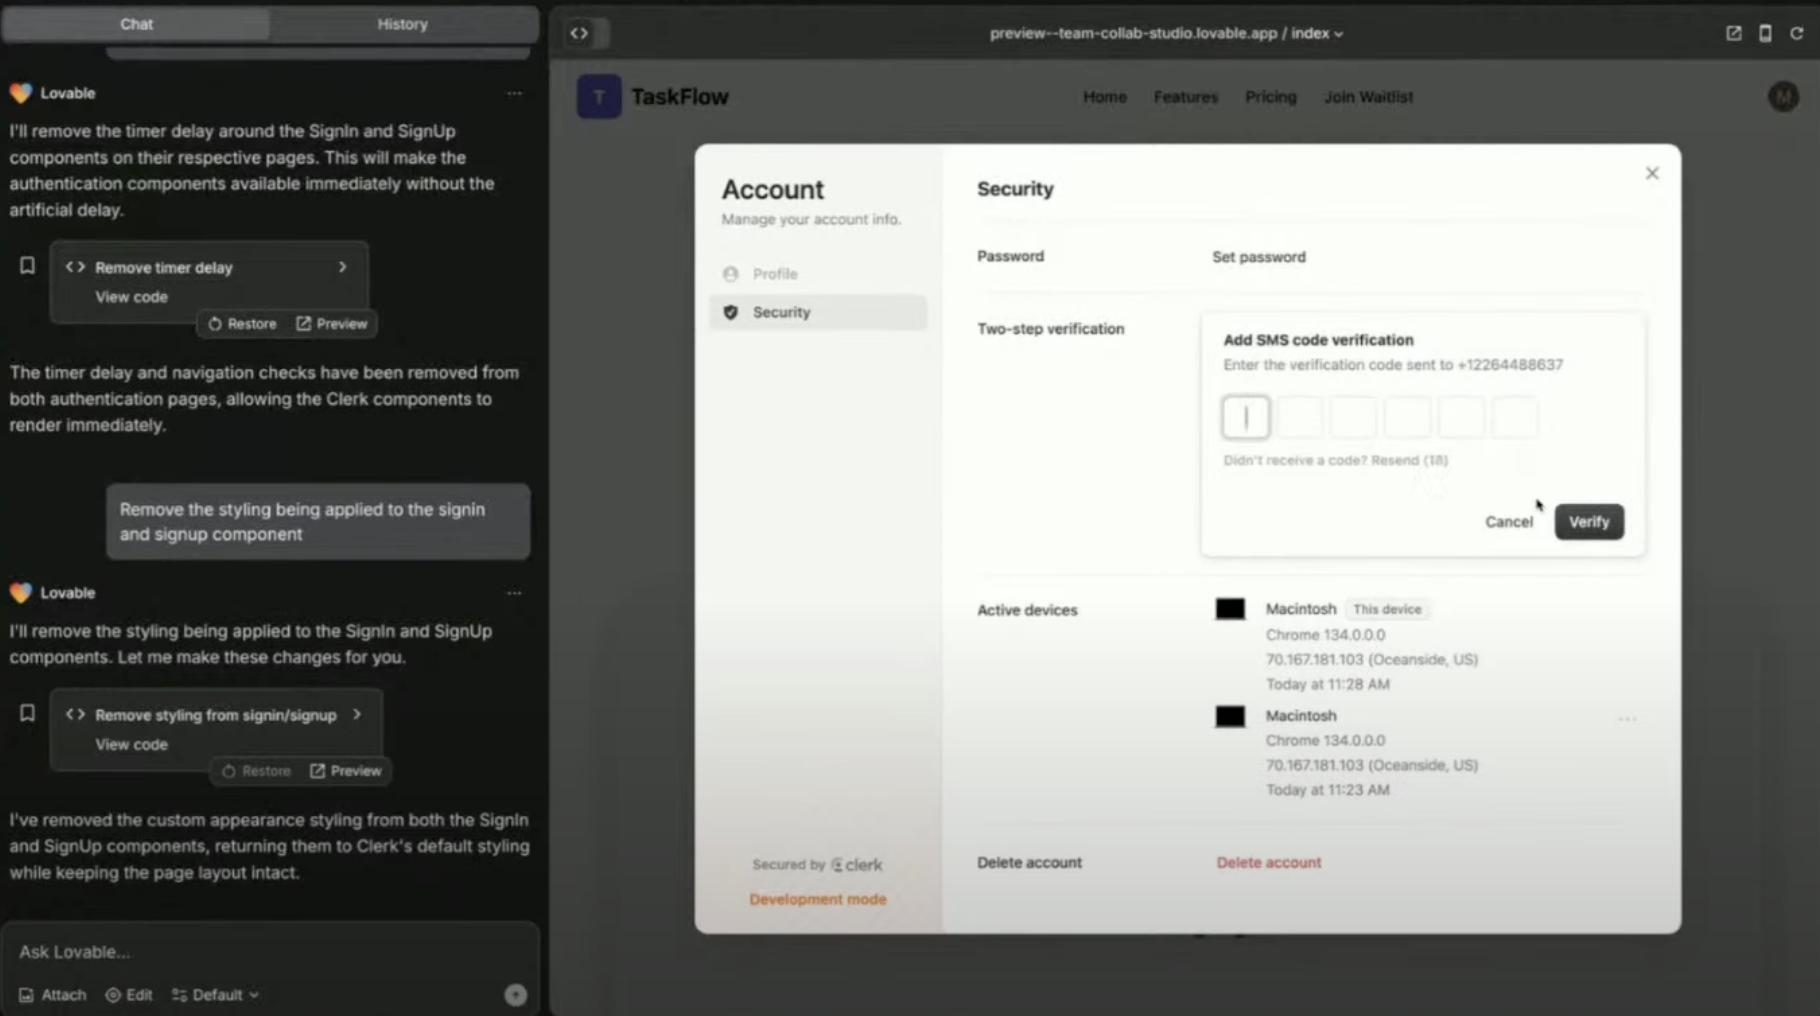
      * Users can manage their own accounts & 2FA

              <img src="https://mintcdn.com/generaltranslation-d8a08cd1/CqzNmr5z5kHJD2HH/images/clerk-organization-members.png?fit=max&auto=format&n=CqzNmr5z5kHJD2HH&q=85&s=219f9a2976ea8de50adce5d6beb0e779" alt="Clerk Organization Members Pn" width="1832" height="1016" data-path="images/clerk-organization-members.png" />
    </Note>
  </Step>

  <Step title="Impersonation Mode (For Admins)" stepNumber="4">
    <Tip>
      **What is Impersonation Mode?**

      Admins can log in as any user to troubleshoot issues
    </Tip>

    Troubleshoot your app as if you were a specific user.

    <Steps>
      <Step title="Step 1">
        In Clerk dashboard > Users, click on a user
      </Step>

      <Step title="Step 2">
        Click **Impersonate**
      </Step>

      <Step title="Step 3">
        View your app from their perspective
      </Step>

      <Step title="Step 4">
        Security: impersonators can’t perform sensitive actions (e.g. change password)
      </Step>
    </Steps>
  </Step>

  <Step title="Integrate with Supabase (Advanced)" stepNumber="5">
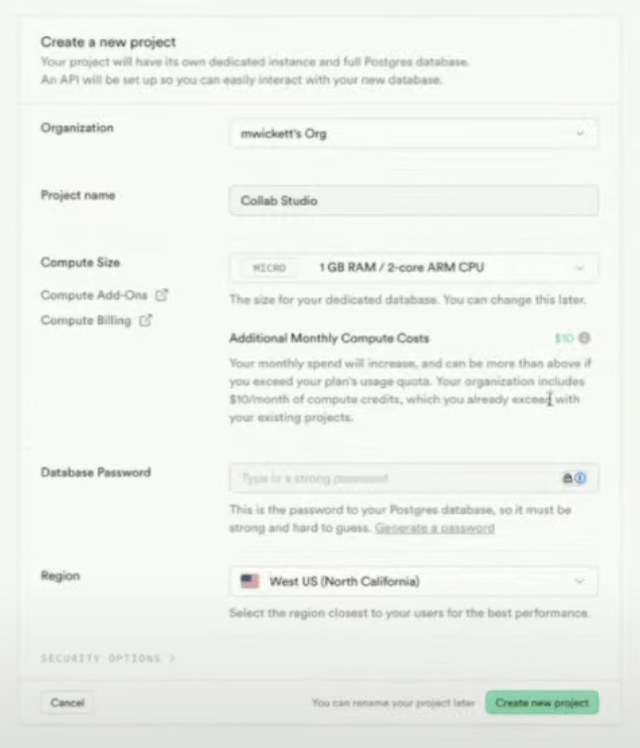
    Combine Clerk Auth with Supabase backend.

    <img src="https://mintcdn.com/generaltranslation-d8a08cd1/jw-DadLCPO99GETa/images/supabase-clerk.png?fit=max&auto=format&n=jw-DadLCPO99GETa&q=85&s=099ac332afdc631e19a074357aa1d909" alt="Supabase Clerk Pn" width="640" height="748" data-path="images/supabase-clerk.png" />

    <Note>
      **Why integrate with Supabase?**

      * Store user data in a database
      * Secure authentication with JWT tokens
      * Connect authentication to app features
    </Note>

    **How to integrate:**

    <Steps>
      <Step title="Step 1">
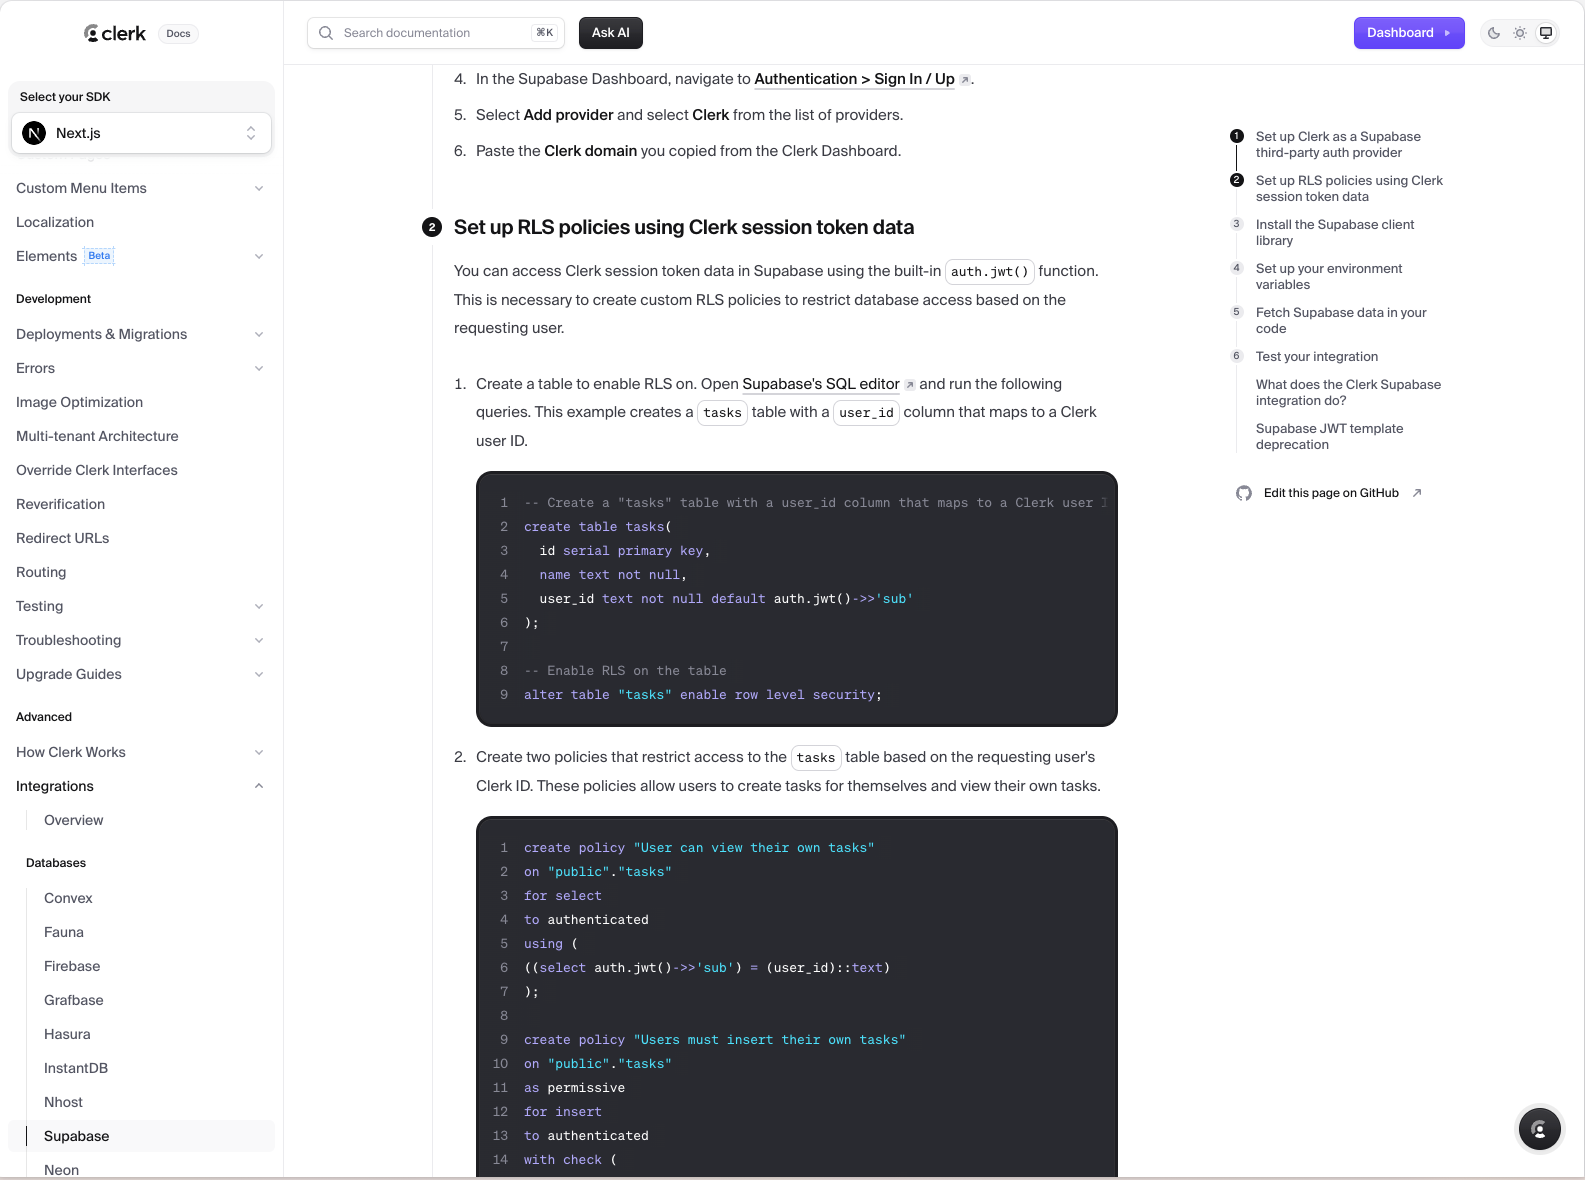
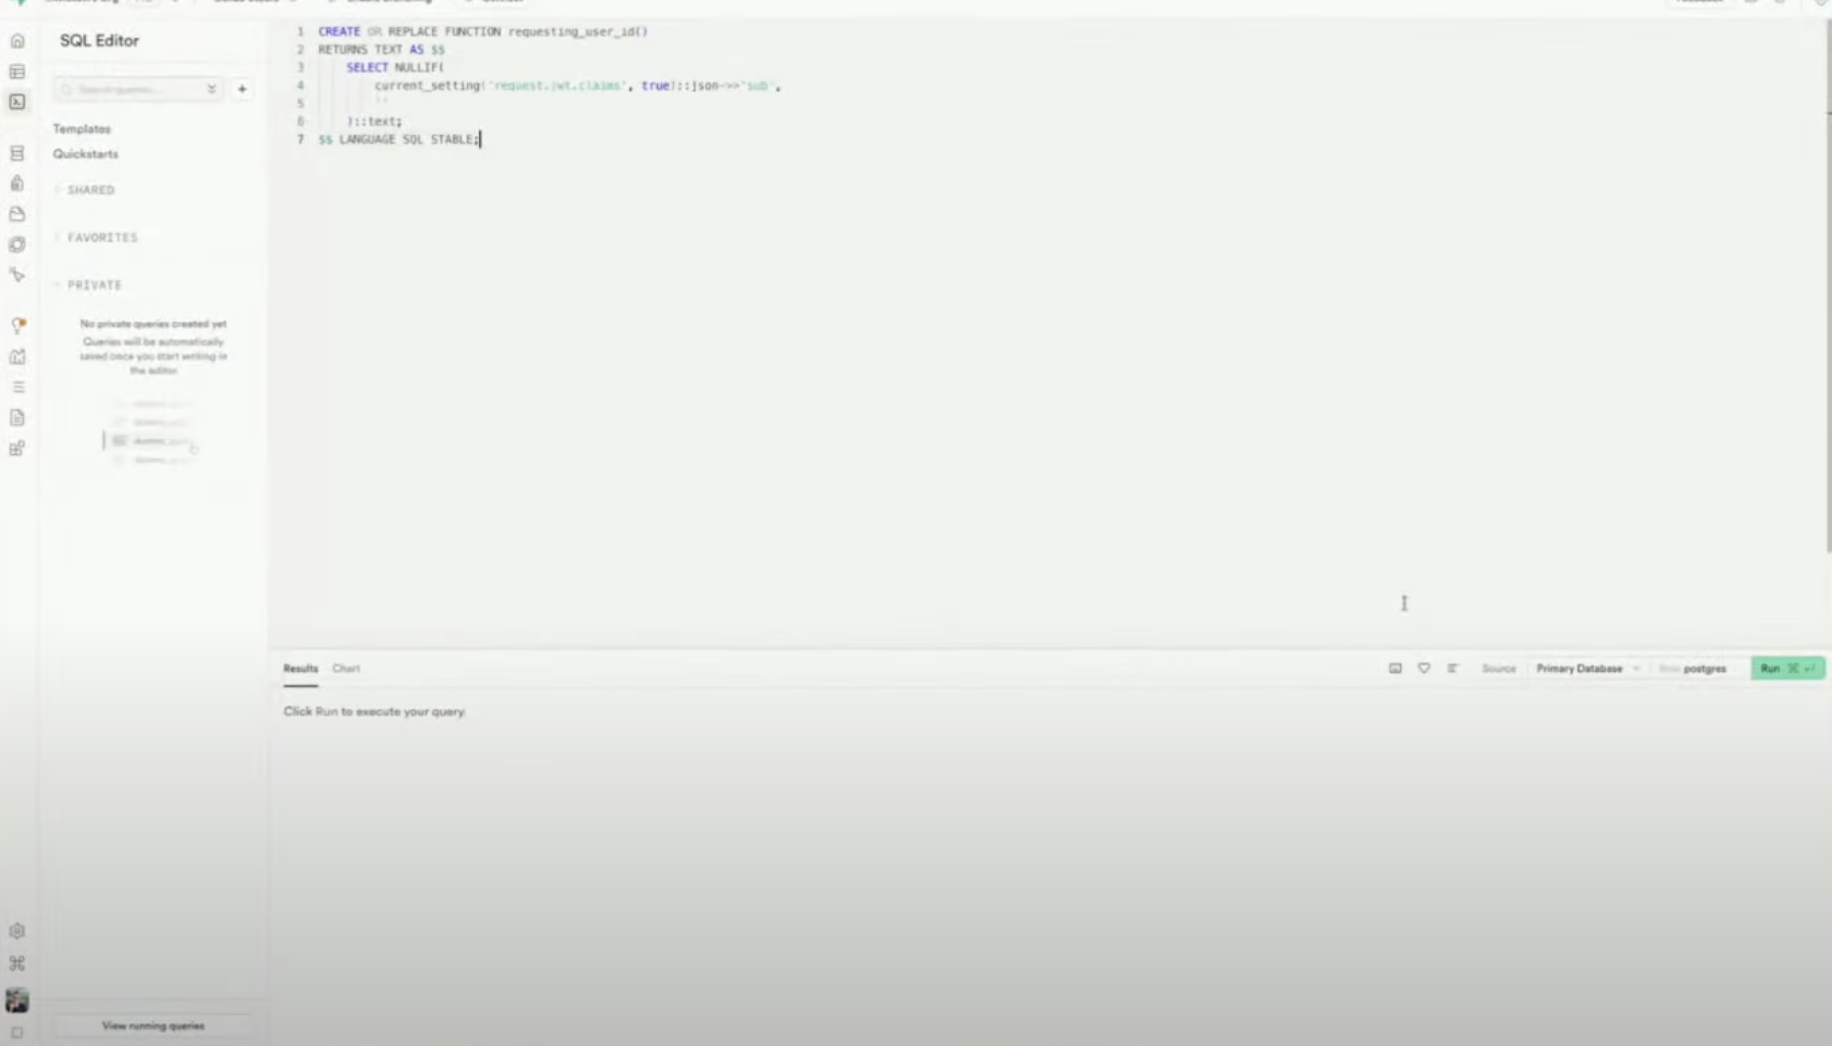
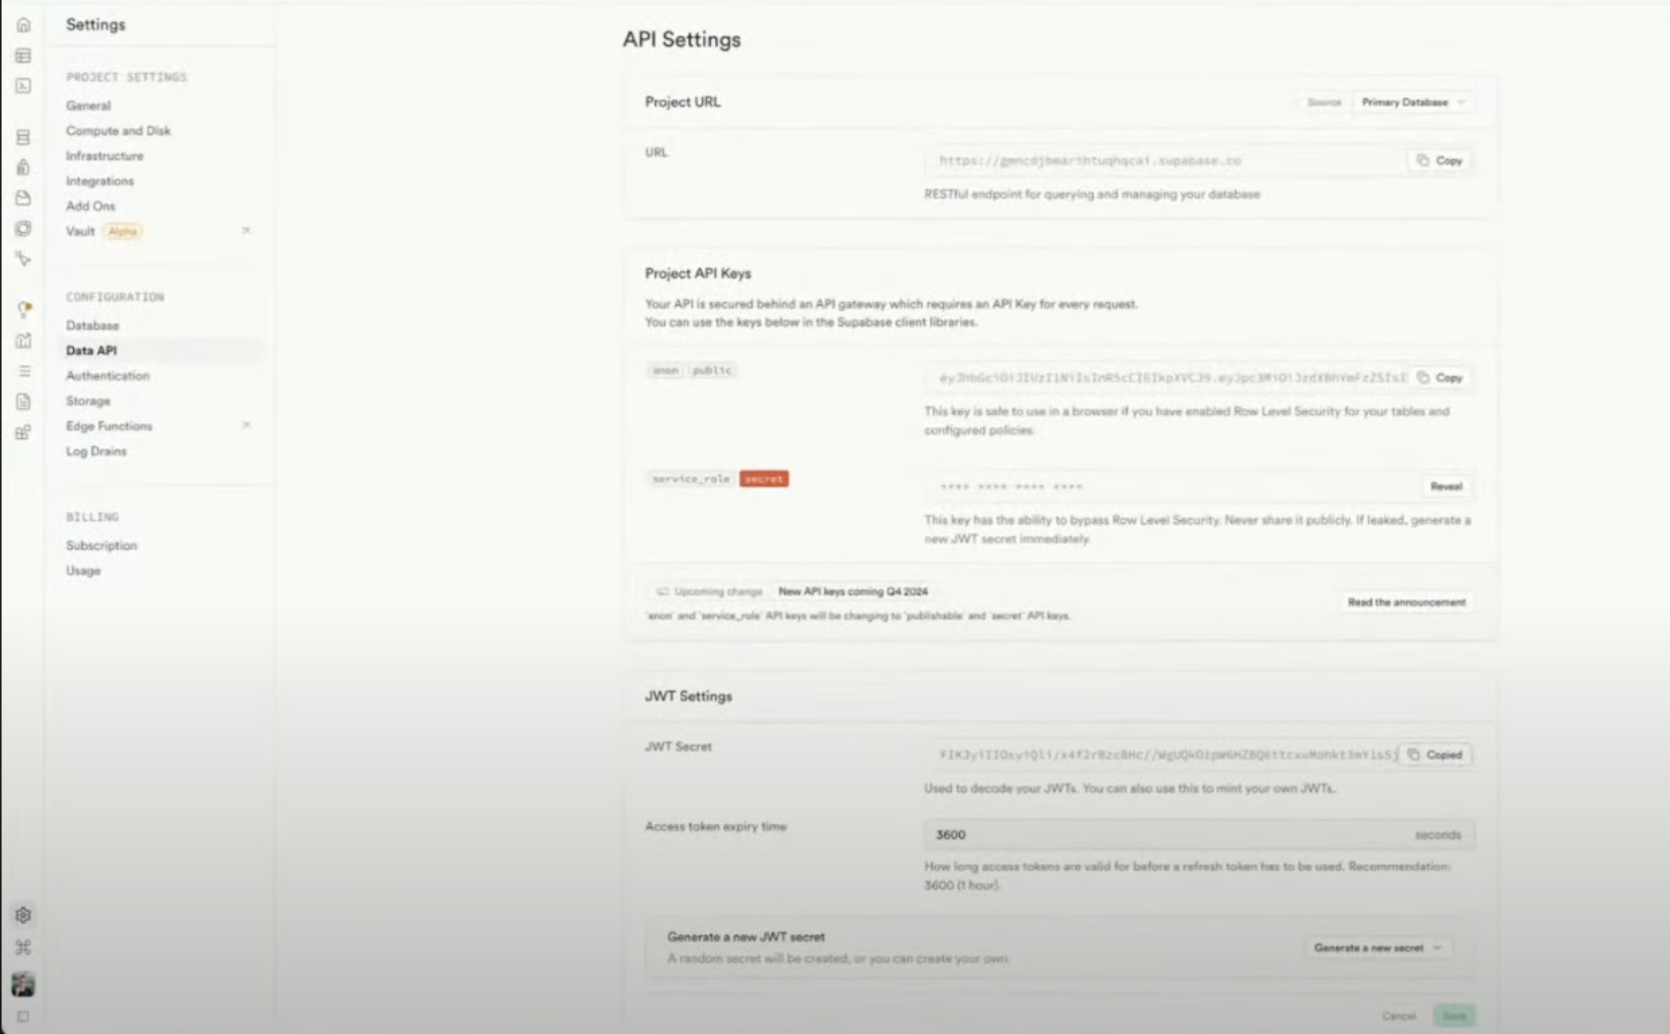
        In Supabase, go to **Settings > API > JWT Secret (**[**documentation**](https://clerk.com/docs/integrations/databases/supabase)**)**

        <img src="https://mintcdn.com/generaltranslation-d8a08cd1/jw-DadLCPO99GETa/images/supabase-clerk-integration-doc.png?fit=max&auto=format&n=jw-DadLCPO99GETa&q=85&s=4c1b798ebc7906a678616e2c56048bb2" alt="Supabase Clerk Integration Doc Pn" width="1585" height="1180" data-path="images/supabase-clerk-integration-doc.png" />

        <img src="https://mintcdn.com/generaltranslation-d8a08cd1/jw-DadLCPO99GETa/images/sql-editor-supabase.png?fit=max&auto=format&n=jw-DadLCPO99GETa&q=85&s=639f9464df1fbf406c91d6fd2d408bd8" alt="Sql Editor Supabase Pn" width="1832" height="1046" data-path="images/sql-editor-supabase.png" />
      </Step>

      <Step title="Step 2">
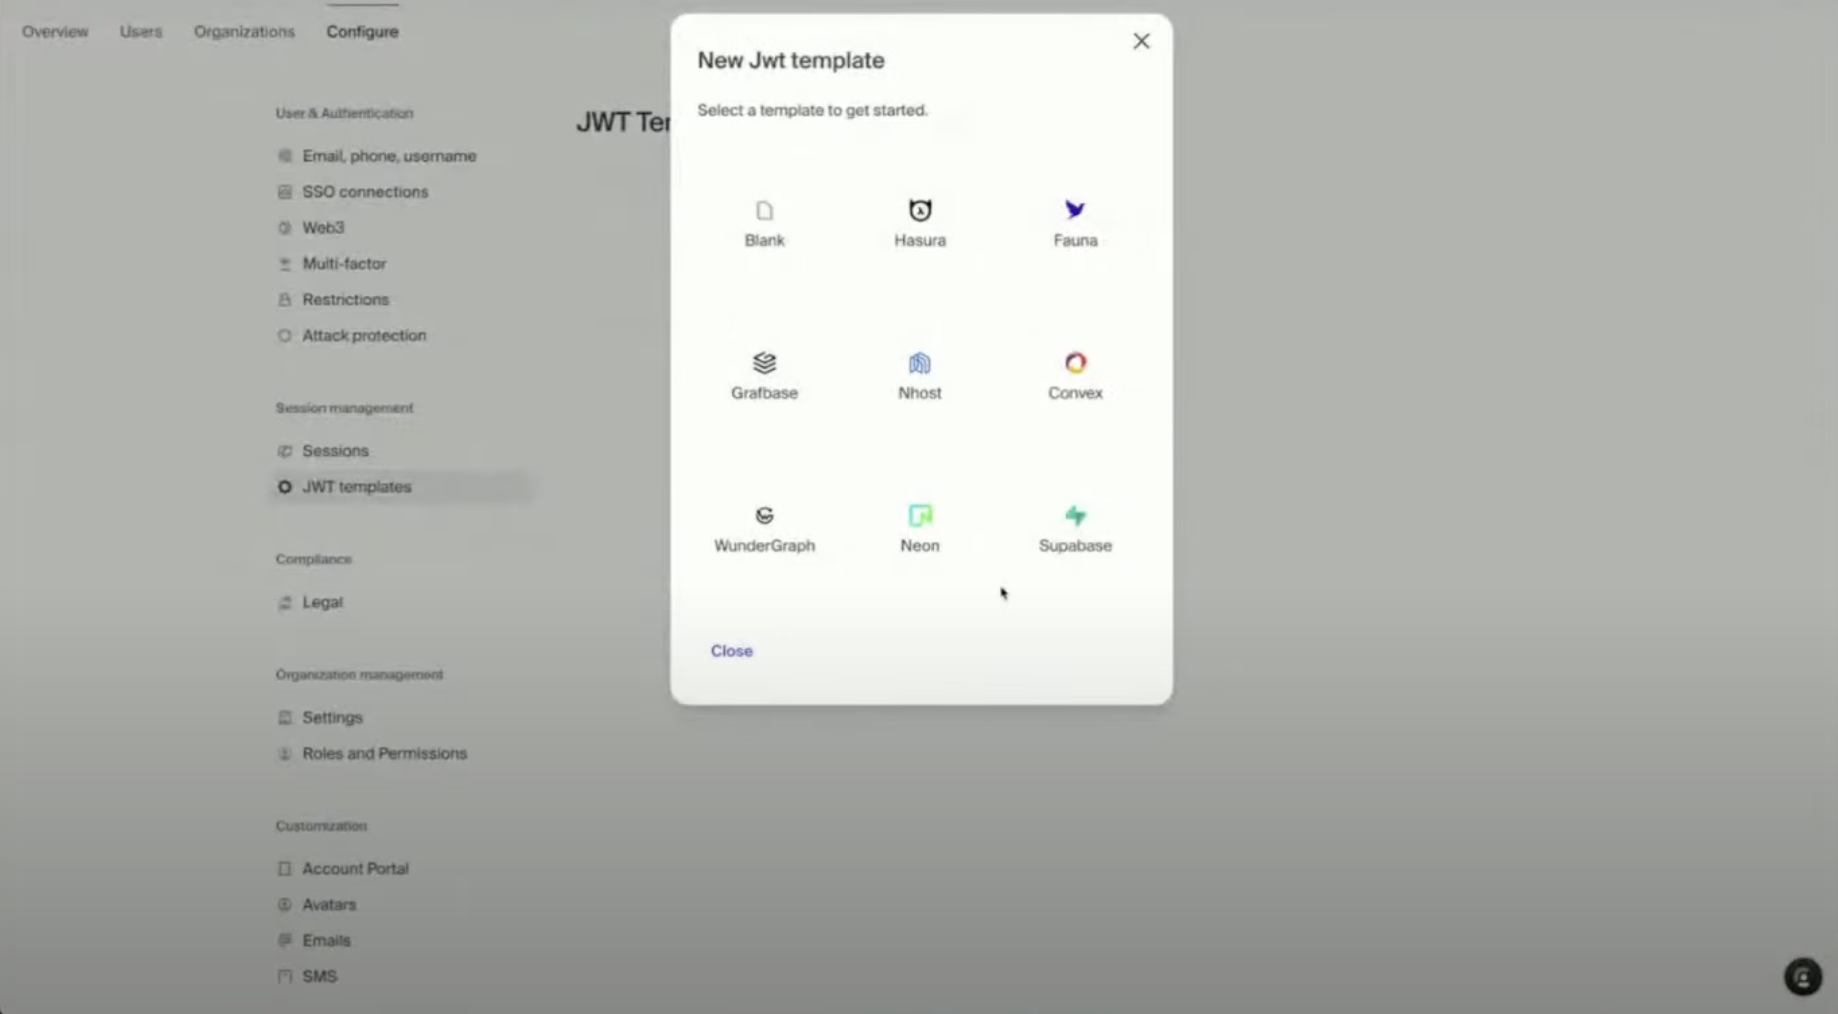
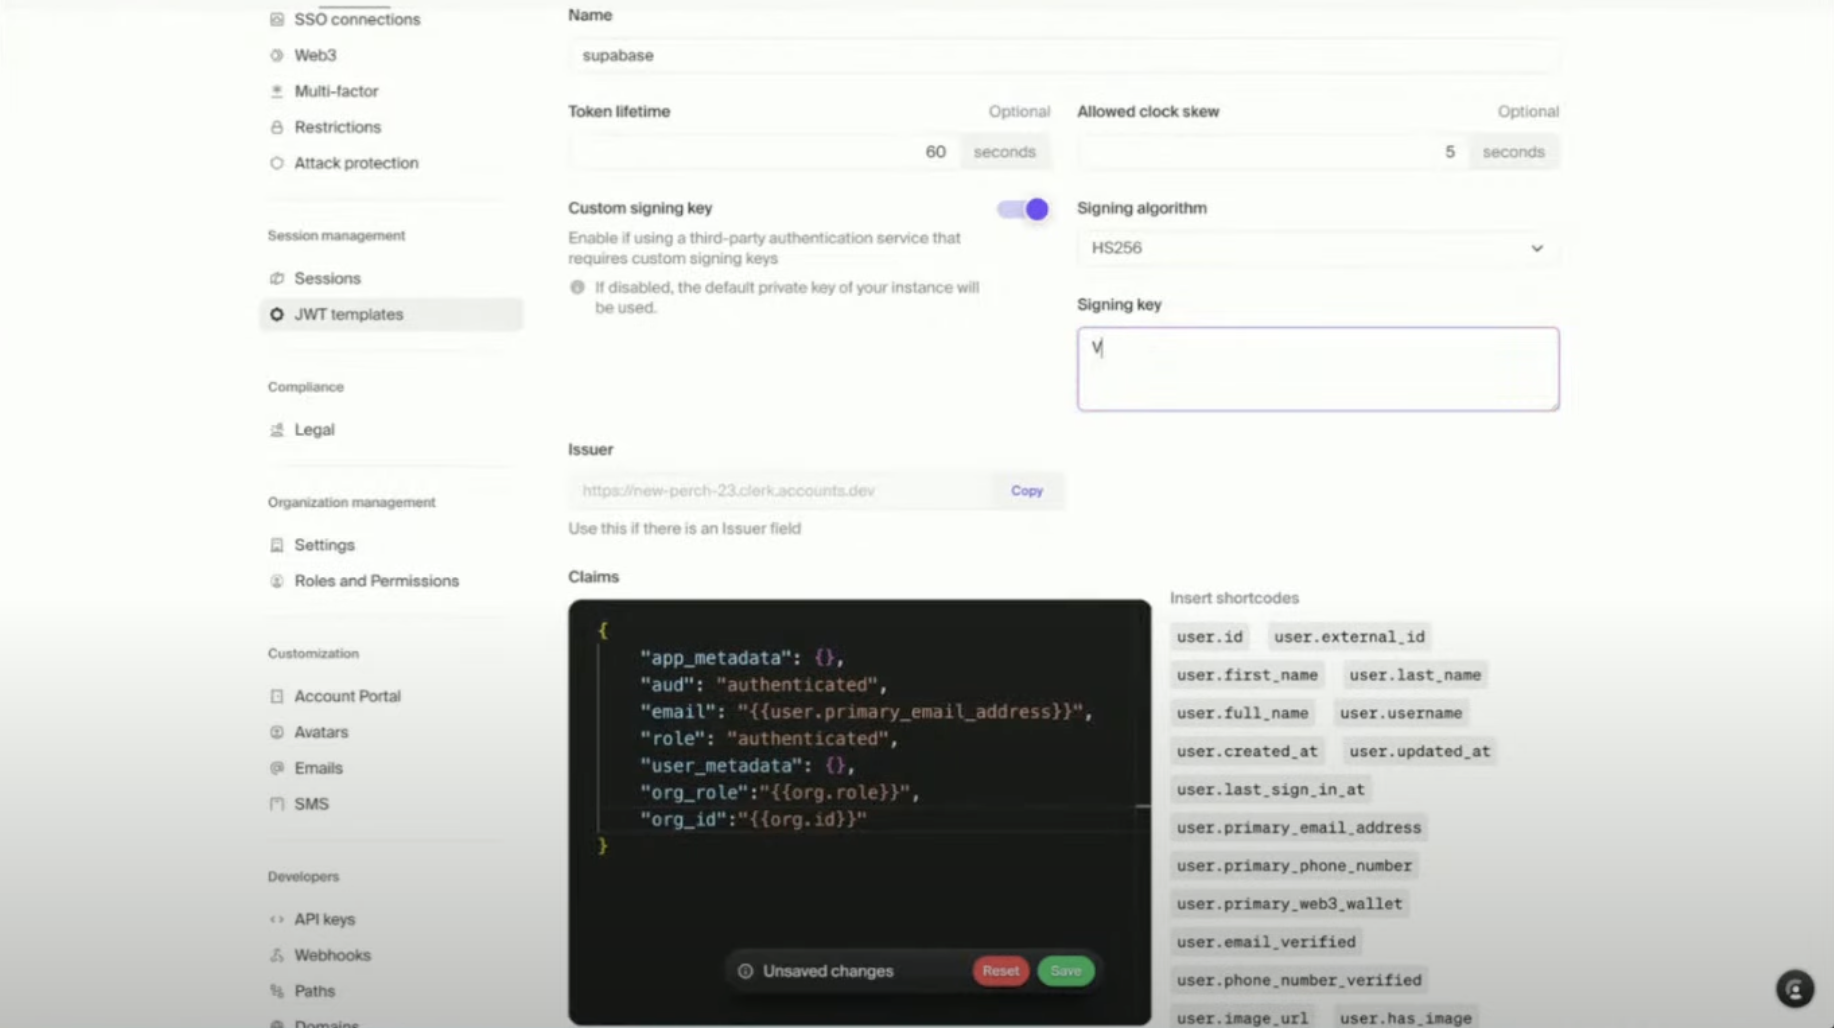
        In Clerk: **JWT Templates > Add Supabase**, paste JWT secret

        <img src="https://mintcdn.com/generaltranslation-d8a08cd1/At48MABj-G93zw7Y/images/Supabase-api-key-clerk.png?fit=max&auto=format&n=At48MABj-G93zw7Y&q=85&s=6ffb7d603fffe943419234209130d04e" alt="Supabase Api Key Clerk Pn" width="1670" height="1034" data-path="images/Supabase-api-key-clerk.png" />

        <img src="https://mintcdn.com/generaltranslation-d8a08cd1/CqzNmr5z5kHJD2HH/images/jwt-template-clerk.png?fit=max&auto=format&n=CqzNmr5z5kHJD2HH&q=85&s=5be5b5dd4b216455362ab2b6c8e5542a" alt="Jwt Template Clerk Pn" width="1838" height="1014" data-path="images/jwt-template-clerk.png" />

        <img src="https://mintcdn.com/generaltranslation-d8a08cd1/CqzNmr5z5kHJD2HH/images/jwt-template-clerk-configuration.png?fit=max&auto=format&n=CqzNmr5z5kHJD2HH&q=85&s=f0364188f00ba2f836cee7cf5b46282f" alt="Jwt Template Clerk Configuration Pn" width="1834" height="1028" data-path="images/jwt-template-clerk-configuration.png" />
      </Step>

      <Step title="Step 3">
        Enable **Clerk as an authentication provider**

        Update RLS policies to use `auth.uid()` from Clerk

        Prompt Lovable to:

        <Info>
          Let's setup supabase to integrate with Clerk. Clerk has been configured with a Supabase secret. Here's an example of implementing the supabase client using Clerk. Use this as a reference.

          *\[Supabase client configuration import]*
        </Info>
      </Step>

      <Step title="Step 4">
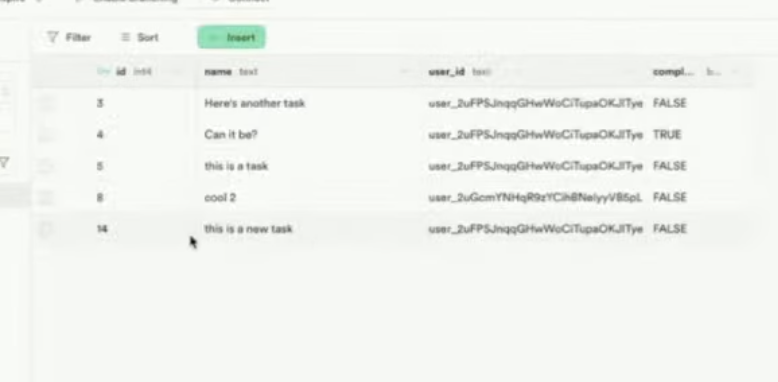
        Confirm Clerk-issued tokens are accepted by Supabase

        <img src="https://mintcdn.com/generaltranslation-d8a08cd1/jw-DadLCPO99GETa/images/supabase-tasks-table.png?fit=max&auto=format&n=jw-DadLCPO99GETa&q=85&s=161f00d83acbb33f24220fbd3ccff779" alt="Supabase Tasks Table Pn" width="778" height="382" data-path="images/supabase-tasks-table.png" />
      </Step>
    </Steps>
  </Step>

  <Step title="Add a Custom Domain (Optional)" stepNumber="6">
    <Note>
      **Why use a custom domain?**

      Boosts brand recognition & trust

      [More information here](https://docs.lovable.dev/tips-tricks/custom-domain).
    </Note>

    <Steps>
      <Step title="Step 1">
        In Lovable: **Project > Settings > Custom Domain**
      </Step>

      <Step title="Step 2">
        Enter your purchased domain (e.g. `app.yourcompany.com`)
      </Step>

      <Step title="Step 3">
        Lovable auto-configures DNS (no need to leave Lovable)
      </Step>

      <Step title="Step 4">
        Deploy & test your app with the new domain.
      </Step>

      <Step title="Step 5">
        Done ✅ — your app is now white-labeled
      </Step>
    </Steps>
  </Step>

  <Step title="Final Thoughts & Next Steps" stepNumber="7">
    **Your app now has:**

    * Secure authentication with Clerk
    * A waitlist to collect early users
    * User & team management features
    * Supabase database integration
    * A professional custom domain
  </Step>
</Steps>

## Bonus: Build B2B features in minutes

Clerk supports:

* Role-based access for organizations
* Invite flows (email-based, pre-built UI)
* Organization profile customization (logo, name)
* Multi-org switching (e.g. Slack-style)

**Ask Lovable to:**

<Info>
  Add organization switcher UI
</Info>

<Info>
  Let users invite teammates
</Info>

## Tips & troubleshooting

* **Already using Supabase Auth?** You can switch to Clerk without rewriting your app logic. Just configure JWT correctly and swap auth provider.
* **Email customization:** Clerk lets you edit all transactional email templates (waitlist, invitations, approvals).
* **Mobile login**: Clerk supports passkeys, OTP, and SMS — no extra config needed in Dev Mode.
* **Compliance**: Clerk is SOC2, HIPAA, and GDPR compliant.

## Frequently Asked Questions (FAQ)

<AccordionGroup>
  <Accordion title="Can I switch from Supabase Auth to Clerk easily?">
    Yes. Clerk and Supabase work well together. You just need to:

    * Set up Clerk to issue JWTs
    * Add Supabase’s JWT secret in Clerk
    * Update Supabase RLS policies to use Clerk’s `auth.uid()`

    This lets you plug Clerk into an existing Supabase-backed app with minimal changes.
  </Accordion>

  <Accordion title="Do I need to configure OAuth providers like Google or GitHub?">
    Only for production. In development mode, Clerk provides shared credentials for testing. For production:

    * Set up your own Google/GitHub/etc. credentials
    * Add them in Clerk under **OAuth settings**
  </Accordion>

  <Accordion title="What’s the difference between Organizations and Users?">
    * **Users**: Individuals who can log in to your app
    * **Organizations**: Groups of users (teams, companies)

    Use organizations when you want:

    * Role-based access (Admin, Member, etc.)
    * Users to invite teammates
    * B2B SaaS-style flows
  </Accordion>

  <Accordion title="What is “Impersonation Mode”?">
    It allows admins to log in as any user — super helpful for:

    * Debugging user issues
    * Understanding their experience
    * Providing live support

    <Note>
      Clerk limits what impersonators can do (e.g., no password changes).
    </Note>
  </Accordion>

  <Accordion title="Can I customize Clerk's UI components?">
    Yes. Clerk offers:

    * Full CSS support via `appearance` props
    * The option to build fully custom UIs using Clerk React hooks

    You can keep the out-of-the-box look or fully match your app’s brand.
  </Accordion>

  <Accordion title="Can I email my waitlist users from Clerk?">
    Currently:

    * Users are auto-notified when approved from the waitlist
    * Bulk email support is **coming soon**

    For now, export emails and use your preferred email tool.
  </Accordion>

  <Accordion title="Is Clerk free to use?">
    Yes! Clerk has a generous free tier:

    * Up to **10,000 Monthly Active Users (MAUs)**
    * Paid plans start at **\$25/month**, with usage-based pricing after

    You can use it in production without paying until you scale.
  </Accordion>

  <Accordion title="Does Clerk support compliance (SOC2, HIPAA, GDPR)?">
    Yes. Clerk is:

    * **SOC 2 certified**
    * **HIPAA-compliant**
    * **GDPR-ready**

    Ideal for teams building in regulated industries.
  </Accordion>

  <Accordion title="Can I use Clerk with Stripe for billing?">
    Coming soon. You’ll soon be able to:

    * Define plans (e.g. Free, Pro, Enterprise)
    * Let users/orgs manage subscriptions from Clerk’s UI
    * Automatically sync data to Stripe

    Follow [@clerkdev](https://x.com/clerkdev?lang=en) on X for updates.
  </Accordion>
</AccordionGroup>

Want a question added to this FAQ? [Let us know on Discord](https://discord.gg/lovable-dev)!

## Final thoughts

Clerk turns authentication into a prompt. You don’t need to build it yourself.

**With just a few clicks and prompts, your app now has:**

* Secure, scalable authentication
* Team & organization management
* Impersonation tools for debugging
* Supabase-backed data and access control
* Custom domain support for a polished UX