> ## Documentation Index
> Fetch the complete documentation index at: https://lovable.generaltranslation.app/llms.txt
> Use this file to discover all available pages before exploring further.
# Customize projects with design tools
> Use design tools to apply and customize themes, modify UI elements, and maintain consistent branding across your project.
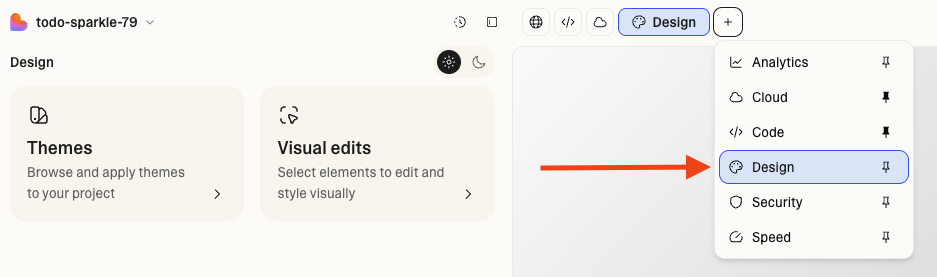
**Design tools** bring together everything you need to visually customize your project — from high-level themes to detailed visual edits. You can manage your project’s overall look through **Themes** or make quick, targeted changes using **Visual edits**, without writing code or using credits.
To access design tools, go to **Design view** from the `+` button next to Preview.
 ## Why use design tools
Design tools empower everyone—designers, marketers, and non-technical teammates—to make design changes visually, stay on brand, and move faster.
### Key benefits
* **Consistent branding:** Apply shared themes that reflect your brand’s identity
* **Faster iteration:** Update layouts and text visually—no code or prompts required
* **Accessible editing:** Non-technical users can make confident design changes
* **Live preview**: See every visual change in real time before publishing
### Common use cases
* Designers maintaining brand consistency across multiple projects
* Marketers launching new campaign pages without leaving brand guidelines
* Product managers refining layouts and copy directly
* Teams quickly building prototypes and variants with shared visual styles
## Themes
**Themes** define your project’s core style system—colors, fonts, spacing, and border radius—forming the foundation of your brand’s identity.
### Key capabilities
* **Apply:** Choose from built-in Lovable templates or apply a custom theme
* **Create:** Generate a theme from your current project
* **Import:** Upload a custom CSS file (such as `index.css` or `globals.css`) to turn it into a theme
* **Customize:** Edit colors, typography, and spacing directly in the UI
* **Share:** Themes are available to all members in your workspace
* **Preview:** Test changes live before applying them
## Visual editing
The **Visual edit** mode lets you change your project visually, right on the page. It’s designed for fast, intuitive adjustments with full control over layout and spacing.
### Key capabilities
* **Multi-select elements** for batch edits by holding `⌘ Command`(Mac) or `⊞ Win`(Windows).
* **Layout controls** for alignment and positioning
* **Adjust margins and padding** on individual sides of containers
* **Edit text, colors, and fonts** directly from the sidebar
* **Enhanced text formatting** with line breaks and inline styling
* **Replace images** by uploading files or adding image URLs
* **Generate AI images** by editing images with prompts
## Quick start
1. Open the **Design view** from the `+` button next to Preview.
2. Switch between **Themes** and **Visual edit** tabs to work on your project’s design in the left-hand panel.
* Go to **Themes** to select a theme or create your own, and apply it to the project.
* Go to **Visual edits** to select elements in the live preview and edit them visually.
For quick access to visual edits, use the **Visual edits** shortcut in the prompt box.
3. **Preview and save** when you’re happy with the result.
Visually customizing your project does not deduct credits, except when:
* Making changes to dynamic elements.
* Prompting the Lovable Agent to modify the design. Use the design tools instead.
## Why use design tools
Design tools empower everyone—designers, marketers, and non-technical teammates—to make design changes visually, stay on brand, and move faster.
### Key benefits
* **Consistent branding:** Apply shared themes that reflect your brand’s identity
* **Faster iteration:** Update layouts and text visually—no code or prompts required
* **Accessible editing:** Non-technical users can make confident design changes
* **Live preview**: See every visual change in real time before publishing
### Common use cases
* Designers maintaining brand consistency across multiple projects
* Marketers launching new campaign pages without leaving brand guidelines
* Product managers refining layouts and copy directly
* Teams quickly building prototypes and variants with shared visual styles
## Themes
**Themes** define your project’s core style system—colors, fonts, spacing, and border radius—forming the foundation of your brand’s identity.
### Key capabilities
* **Apply:** Choose from built-in Lovable templates or apply a custom theme
* **Create:** Generate a theme from your current project
* **Import:** Upload a custom CSS file (such as `index.css` or `globals.css`) to turn it into a theme
* **Customize:** Edit colors, typography, and spacing directly in the UI
* **Share:** Themes are available to all members in your workspace
* **Preview:** Test changes live before applying them
## Visual editing
The **Visual edit** mode lets you change your project visually, right on the page. It’s designed for fast, intuitive adjustments with full control over layout and spacing.
### Key capabilities
* **Multi-select elements** for batch edits by holding `⌘ Command`(Mac) or `⊞ Win`(Windows).
* **Layout controls** for alignment and positioning
* **Adjust margins and padding** on individual sides of containers
* **Edit text, colors, and fonts** directly from the sidebar
* **Enhanced text formatting** with line breaks and inline styling
* **Replace images** by uploading files or adding image URLs
* **Generate AI images** by editing images with prompts
## Quick start
1. Open the **Design view** from the `+` button next to Preview.
2. Switch between **Themes** and **Visual edit** tabs to work on your project’s design in the left-hand panel.
* Go to **Themes** to select a theme or create your own, and apply it to the project.
* Go to **Visual edits** to select elements in the live preview and edit them visually.
For quick access to visual edits, use the **Visual edits** shortcut in the prompt box.
3. **Preview and save** when you’re happy with the result.
Visually customizing your project does not deduct credits, except when:
* Making changes to dynamic elements.
* Prompting the Lovable Agent to modify the design. Use the design tools instead.